Karist Angel Minnow Assembly Guide

General Notes
Polystyrene cement - only use superglue if you want to go insane! All of our models are designed to be assembled with polystyrene cement as it gives some time to re-pose while gluing, fuses the models together and prevents brittle joins like other glues do. Make sure you have polystyrene cement in your toolkit before you begin!
We want you to experiment! We've broken our models up into lots of parts and given a fair few spare parts so that you can push yourself out of your comfort zone, learn new skills and create some really unique models. We've tried to price things so that it won't break the bank if you make a mistake, so please cut stuff up and have some fun. Start simple with a slice here and a re-pose there, and watch your confidence and skills increase until you are a master modeler!
Basing - Always make sure you glue your model to its base with an eye on the arc markers on the sides of the base. The arc marker indents should be at the halfway point between the front and back of the model to show the front and back halves of the model when gaming. See the Maelstrom's Edge rulebook for more detailed notes on this.
Dry fit before gluing! - There are lots of pose options possible, but that means there is also the freedom to screw up and make some bad poses! Sticking the parts together and seeing how things look will usually lead to a model that is fairly static and repetitive. You should consider knee, hip, torso, and arm positions when gluing and ensure that you have a pose in mind before you start gluing things together. If in doubt or insecure about your talents in the posing area, we recommend you try to copy the poses from some of our studio models found here in the gallery.
Karist Angel Minnow Assembly Notes
Two Angel Minnows can be assembled from the following sprue:
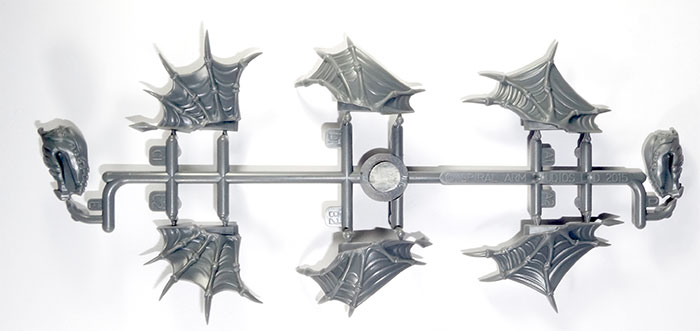
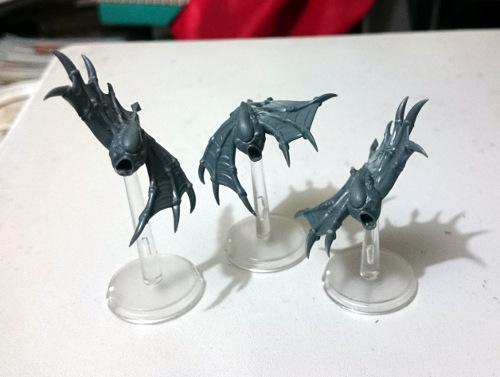
Minnows are the easiest models in our range to assemble. Simply take one of the body parts and attach one set of paired wings A1/A2, B1/B2 or C1/C2. You'll need to trim the sprue ejection points off the inserts of the wings in some cases (the little circles visible on part C1 at least) to ensure a flush fit. Make sure that the sprue connection points are also trimmed flush so that there is no seam when gluing the wings together.
Preparing the body for assembly is very straightforward. There is a mould-line 'ring' around the face of the minnow which is necessary as part of our sliding-core moulds. This ring can be cleaned by scraping it with a sharp knife, but is fairly subtle. The line exists because that is where a separate part of the mould comes in and allows us to get side detail. Without that mould part (and corresponding line), we would have had to make the body in two or even three parts.

The minnows use flight bases which, just like Epirian Firefly Drones, can be magnetised effectively. If doing so, clip off the peg from the flight base and add a 3mm cylindrical magnet. The minnow should then have a corresponding 2mm magnet inserted in the torso hole. You may need to deepen the hole in the minnow's body to fit a magnet flush.
The sockets for flight bases on the underside of minnow models have a tendency to retain some material from the moulding process. As such, you may find you need to stick a drill bit or file into the torso hole if the model does not sit neatly on it's flight base peg. Usually this is not an issue, and if you are gluing the flight stand in place permanently then it is also generally a non-issue.
Converting minnows can be a touch more challenging than our other models and require some sculpting to smooth out seams, so if you want to try your hand at some more advanced sculpting, they are a fun place to start. Here are some examples of doing fun things by pairing different wings together: