


Maelstrom's Edge Walkthrough - Part 2
Back to Part 1 of the Walkthrough2.3. The End Phase
With each unit having been activated, the first turn now comes to an end. To finish a turn, we go through an 'end phase', in which three things happen:
- players first get to choose to destroy any of their own units in order to bring them back as reinforcements later. This can be useful when a unit has suffered many casualties or when it is unable to influence the battle in its current location;
- players then calculate the number of Victory Points or VPs they get in this end phase, according to the mission objectives.
- if the mission hasn't been completed, there's one more thing to do in the end phase, and that is to gather any unused command points from command models still alive on the table and put them back in your pool to use next turn.
We won't be destroying any units this turn, so let's go to step 2: counting victory points. The primary objective is to contact the Cybel Refinery markers we placed. No unit has done so, so no points here as of yet. The secondary objective is to destroy one third or even half of the enemy units. As all units are still in the game: no points here either. We're ignoring the tertiary faction objectives in this tutorial.
Grand total: 0 victory points for both sides. However, the Karists are nearing an objective and both sides suffered casualties, so it won't be long before points are scored.
We'll be skipping the third step, as we're not using command points in this tutorial. Finally, remove all the 'activated' tokens by the units. Now we get to go on to turn 2!
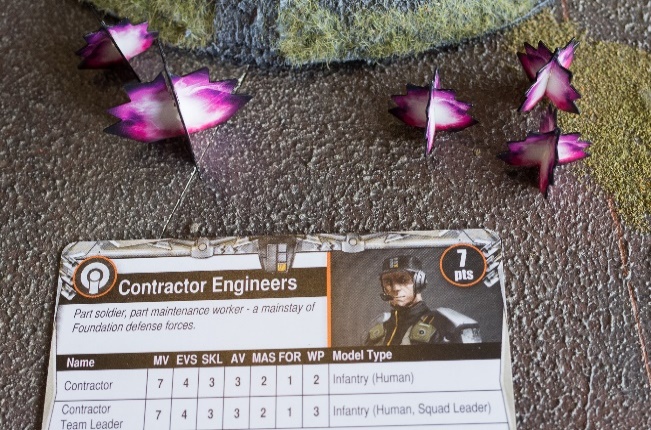
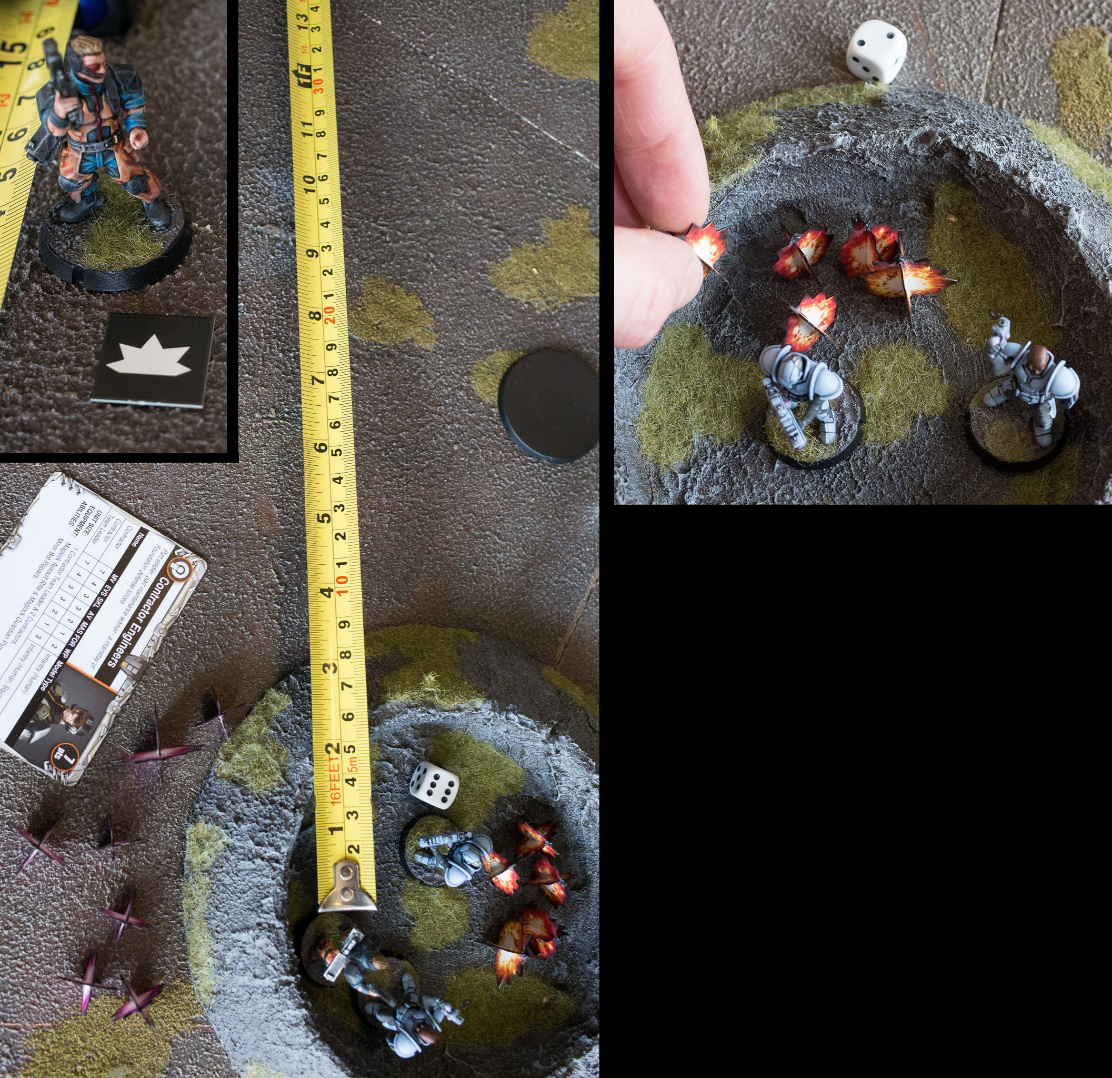
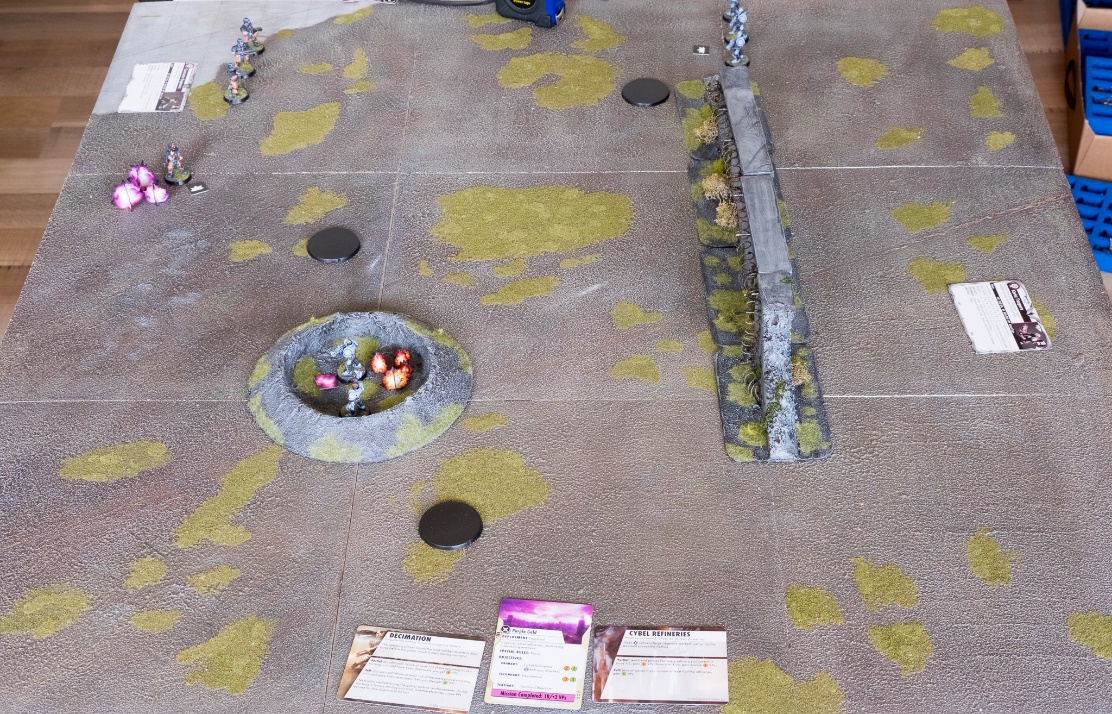
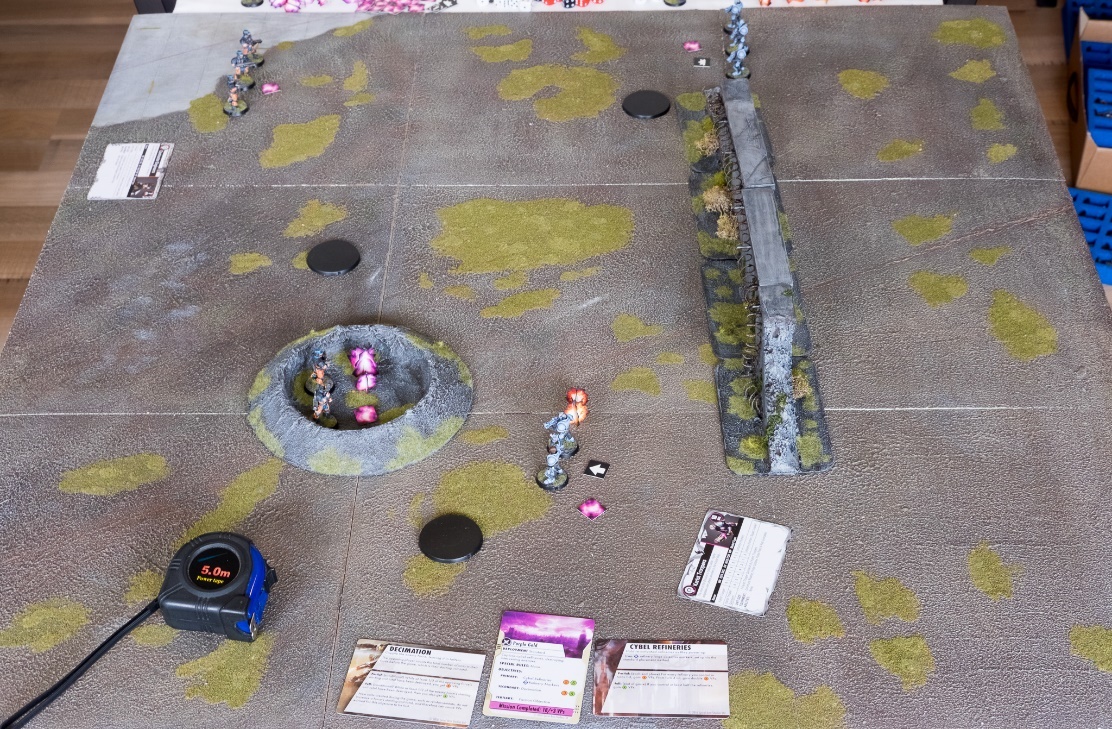 The battlefield at the end of turn 1.
3. The Next Turn
The next turn follows the same structure as the first, which means we start with a command phase.3.1. Command Phase: Decide Priority Player
We start the second turn by determining who is to be the priority player. Players roll off. The Epirian player rolls higher, so gets to decide if he wants to be priority player. He decides not to, which means the Karist player is the priority player in the second turn. He will start activating one of his units. There are still no reserves or Command points in this tutorial, so we can skip those steps.
3.2. Action Phase
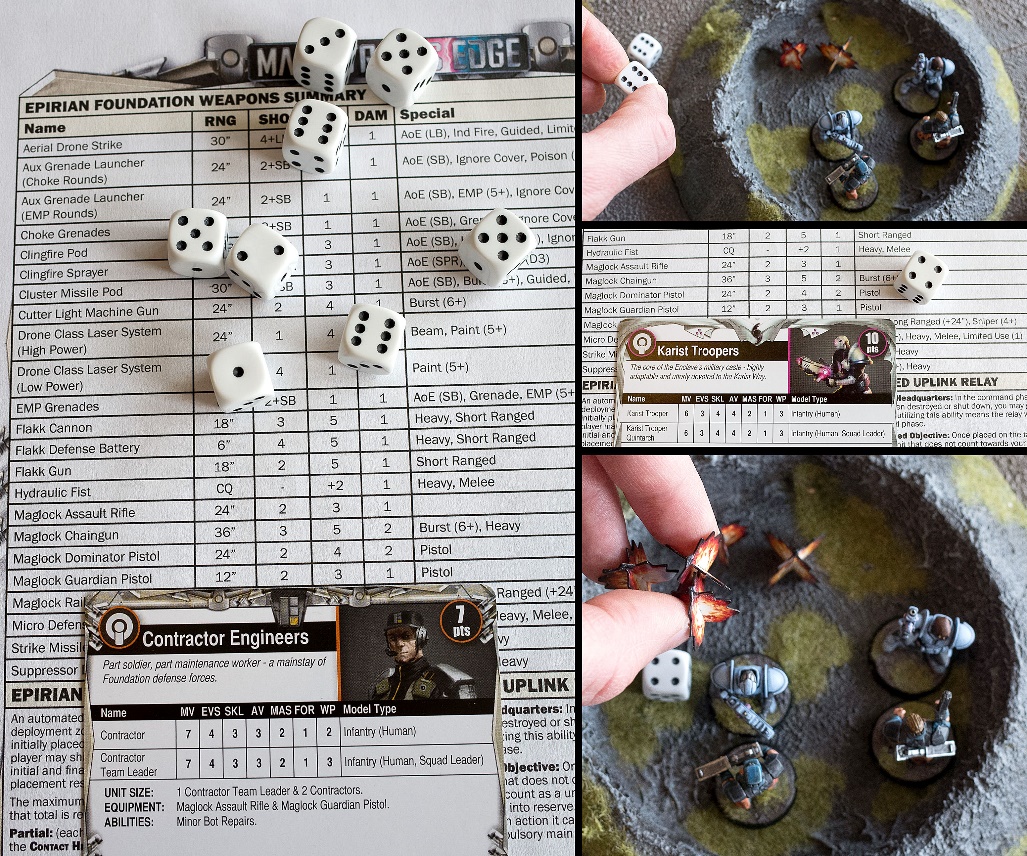
The Karist player decides he might as well try and charge the Contractors in the crater with his nearby Troopers. There are 4 STs on his Trooper unit, so with his unit discipline of 3 he will need a 4+ to pass the discipline check. Luckily, he succeeds: the Charge can get started. Note that activating the unit means the 'on the move' token is removed.
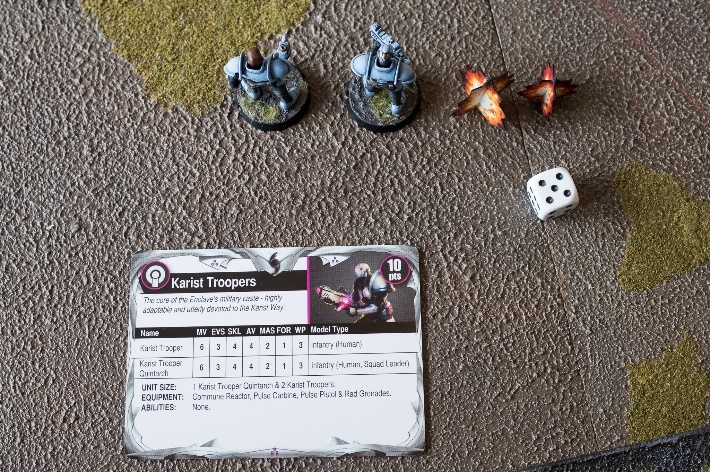 3.2A) Turn 2: the Karists pass their activation check. Their 'on the move' token is removed.
3.2.1. The Charge Action
A charge happens in 5 steps
- Declare charge target
- Move charging models
- Resolve defensive fire
- Resolve CQ fighting
- Shake-off STs
Step 1) When you charge, first select a target unit. The target can be any unit you can reach with a double move. Before you actually move, check if your starting position is in the enemy's front or rear arc. Starting a charge from the enemy's rear will give you an advantage, because wherever you move from there, you will count as shooting at the target's rear arc. As explained earlier, this means the target's cover value is reduced by 1. Also, when the target comes to fire defensively, it can only fire wild.
The Karist unit doesn't start in the Contractor's rear arc, which means it'll be a tough target.
Step 2) Next, move your unit. Each model must try to contact an enemy model and the charging unit must end up facing the target unit. The Karists are moved into the crater to contact the Contractors, then pivoting first the squad leader to face the Contractor squad leader, and then the rest of the unit faces the same way.
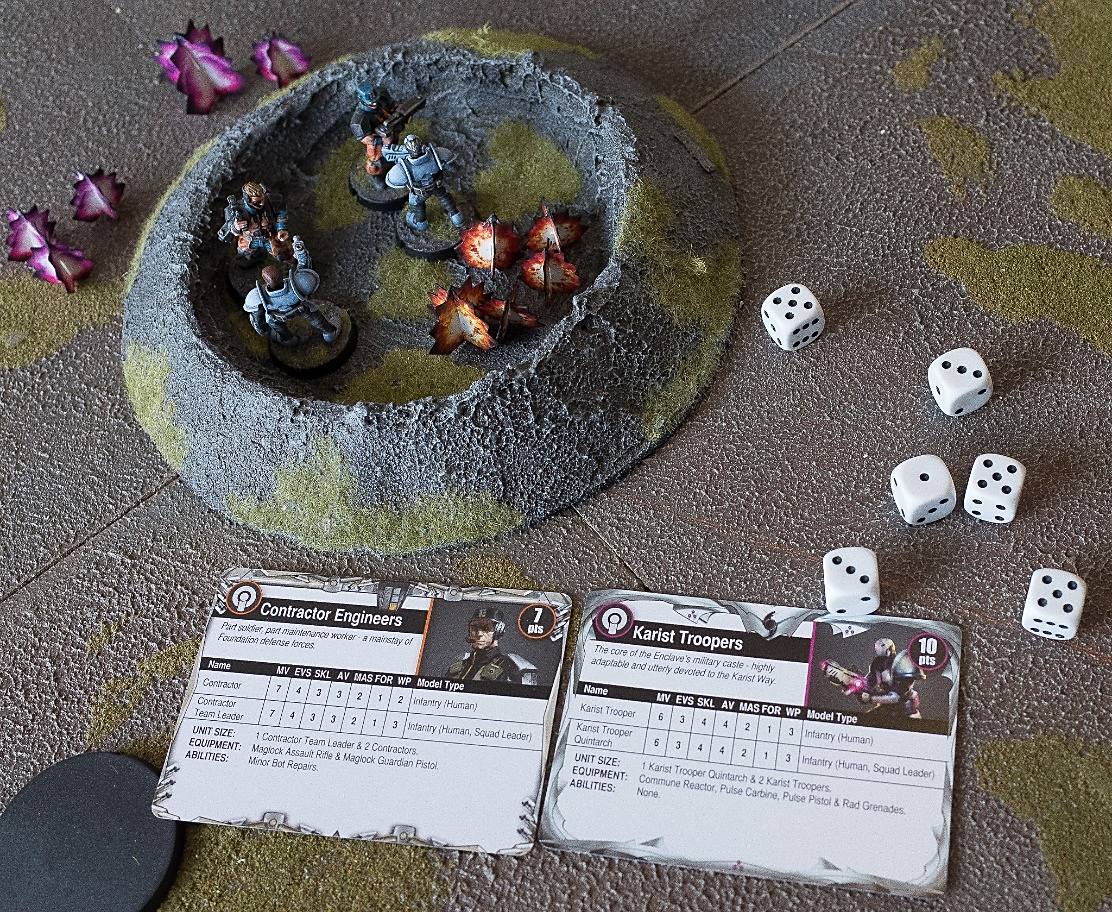
 3.2B) The Karists are moved into the crater as part of their charge. A charge is a normal double move, although open ground bonus movement cannot be used.
3.2.2. Grenades
When you move your charging models, you may choose one of the models to throw a grenade, if it's equipped with any. When you do so, the target unit immediately gets D3 extra STs. The throwing model, however, only fires half its normal shots in the ensuing close quarter fighting.
Karist Troopers are armed with grenades, so let's have one of them throw a grenade. The Karist player rolls a D3 and gets to add 3 STs to the Contractor unit, putting them at 9 tokens.
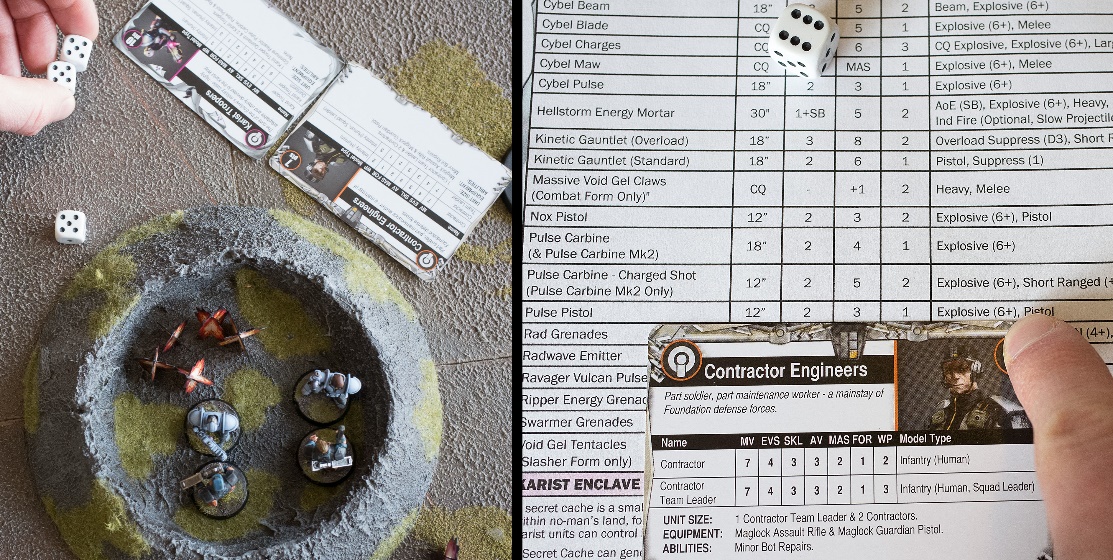
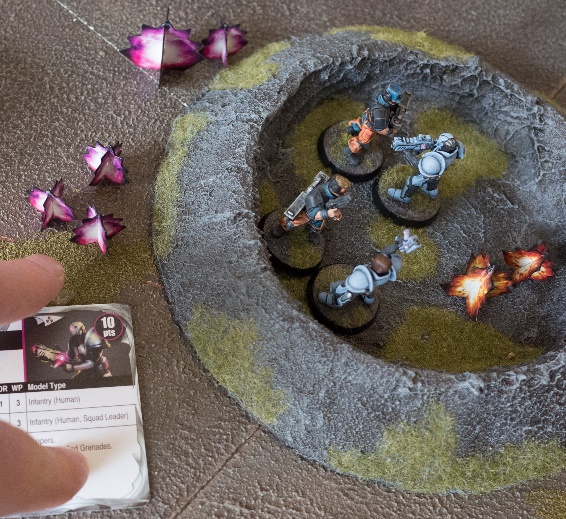 3.2.2) By tossing a grenade, the Karists add 3STs onto the Contractor unit before they have to suffer defensive fire.
3.2.3. Defensive Fire
Step 3) After the charging unit has moved and maybe tossed a grenade, the target unit may fire a round of defensive fire at the chargers. Defensive fire is what's called a free action, that interrupts the action of the unit that was just activated, in this case the charge. We've mentioned defensive fire a couple of times in this tutorial, but haven't yet explained what it is. Defensive fire is an action that allows a round of shooting. The original target unit gets to fire this round prior to the activated unit firing at them. It happens most commonly when a unit is targeted from within short range, that's 6", or when it's being charged. It's important to be aware of this, because it means every time you want to shoot something from short range, or charge, you will get shot first!
In this case, the Contractors get to fire a round of defensive fire at the Troopers as they charge in. This is a normal round of shooting, but you must make a check to see if you can fire normally or can only fire wild. This is a discipline check, the same as the unit activation check. If you pass: fire normally, if you fail: fire wild. As noted earlier: if the charging unit's starting position was in the target's rear arc, then no check is necessary: the defensive fire will be wild fire. Furthermore, a charging unit counts as being on the move, which means it is a fleeting target and will therefore double its EVS, and gains the Dodge (1) ability, which as we've seen allows the unit to ignore 1 hit, just like if it were in cover. The charging unit cannot make use of any actual cover when it faces defensive fire, though.
 3.2.3A) Due to the grenade, the number of STs on the Contractors is triple its discipline, which means they are shell-shocked: they automatically fail their defensive fire discipline check and must fire wild.
Furthermore, a unit firing defensively at a moving unit will always count as having line of sight, being within short range, firing towards their front arc, and hitting the approaching enemy in their front arc.
Now, the Contractors have 9 STs as a result of the grenade, which is 3x their discipline (squad leader WP is 3). This means they are shell-shocked and will automatically fail this discipline check. A failed defensive fire discipline check means the Contractors will be firing wild. That the charging unit is a fleeting target now makes no difference.
There are two models left in the Contractor unit. If they would fire their assault rifles, they would each be firing 2 shots as before. However, as defensive fire is always assumed to be at short range, it's now beneficial for them to use their Maglock Guardian Pistols, rather than their assault rifles. All pistols have the 'Short Ranged' ability, which means they double their shots at short range. A Guardian Pistol has SHO2, so doubling that will give 4 shots per Contractor, for 8 shots total.
Of the eight dice, two end up a 6, scoring two hits. Charging units have the Dodge (1) ability, though, so the Karist player gets to discard one of these hits. (It doesn't matter that the unit is now also in area terrain, as defensive fire ignores cover.)
One hit remains, that needs a 4+ to penetrate (PEN3 vs. AV4). The roll succeeds, causing a penetrating hit with DAM1 on a model of the Karist player's choosing. DAM1 is not enough to cause an injury, but we still place 3 STs on the Karist unit: 1 for being a target of the defensive fire shooting, 1 for ignoring a hit through the Dodge ability, and 1 for having suffered 1 damage. The Karist unit now has 7 STs. With this, the Defensive Fire Action is at an end, and the charge continues.
 3.2.3B) The Contractors use their pistols to fire defensively at the charging Karists. At short range, these are particularly effective, which means the two models together roll 8 dice to hit. Firing wild, they hit only on sixes. One of the two hits then gets discarded because charging units count as being on the move and therefore have the Dodge (1) ability. At PEN3 vs. AV4 the remaining hit succesfully penetrates with a 4+, causing 1 damage. This is not enough to injure a Trooper, but adds to the STs placed on the Karist unit: 3 in total (1 for damage, 1 for being a target, 1 for dodging a hit).
3.2.4. Close Quarters Fighting
Step 4) If some of the charging models survived, it's time for Close Quarters fighting. This is the same as firing a normal round of shooting, but in a Charge you can only use Close Quarters weapons. These are any melee weapons, such as a blade, but also pistols and even bare hands if necessary. Pistols will perhaps be the most common weapon used in Close Quarters fighting.
Now, both Karist Troopers survived the defensive fire. The only CQ weapons they have are their Pulse Pistols, so that's what they'll have to use. The following rules are in force during CQ fighting:
- The target of CQ attacks is always considered to be at short range and within line of sight. Whether the attacks hit the target's front or rear arc is determined by the arc the charging unit starts its charge in, not its location when actually firing, as mentioned earlier.
- The target of CQ attacks never counts as being partially obscured by intervening models and terrain. However, it can still be a fleeting target for any other reason, such as for being in cover, on the move, etc.
As the Contractors are in cover, they will count as a fleeting target. Let's quickly restate the 7 steps for a round of shooting, as they are the same in a Charge Action:
- Nominate a target: this must be the charged Contractors. We've seen they're assumed to be in sight, at short range, attacked in their front arc, and a fleeting target.
- Determine number of shots: just like the Guardian Pistols, the Karists' Pulse Pistols have the short ranged special rule and therefore fire double the number of shots on their profile. For two Troopers, this would normally make 8 shots. However, as one Trooper tossed a grenade, he must halve his shots again, making for a total of 6.
- Roll to hit: with SKL4 vs. EVS8 (4 doubled because the Contractors are a fleeting target), the Karists need 5+ to hit. Of 6 shots, 3 manage to hit.
- Apply cover: the Contractors are in cover with cover value 2, so may discard two of the hits, leaving 1.
- Roll to penetrate: With PEN3 vs. AV3, the Karists need 4+. A 6 is rolled, which is extra tasty because their Pulse Pistols also have the 'Explosive (6+)' ability. This means this penetrating hit counts as having DAM2.
- Remove casualties: The Epirian player assigns the penetrating hit to the non-squad leader model. As the damage equals his MAS, this hit causes an injury and thereby kills the model, as it only has FOR1.
- Place suppression tokens: We place 1 token for being a target, 2 more for ignoring two hits through cover, and 1 more for suffering two damage, making 4. Added to the 9 already on the unit, that makes 13.
 3.2.4A) The next step in the charge is close quarters fighting. The Karists use their pistols and would also fire eight shots, but one of them can only fire half his shots because he tossed a grenade, so six dice are rolled. SKL4 vs. EVS8 (the Contractors are in cover and therefore a fleeting target), means the Karists need 5+ to hit: three succeed.
 3.2.4B) The Contractors are taking cover in area terrain with cover value 2, so may discard two of the three hits. The remaining hit must roll 4+ (PEN3 vs. AV3). Not only does the Karist player hit, but he rolls a six! This means the Pulse Pistol's Explosive ability turns the DAM1 hit into a DAM2 hit.
 3.2.4C) The Epirian player allocates the hit to the non-squad leader model. The DAM2 hit injures and kills the MAS2 FOR1 Contractor. In total, the CQ fighting results in 4 additional STs on the Contractor unit: 1 for being a target, 2 for ignoring 2 hits through cover, and 1 for the damage done. The total on the unit is now 13.
3.2.5. Charge Results
Step 5)If the fighting caused any damage, the target needs to take another discipline check and must retreat if it fails, which means a charge can be used to drive your enemy back.
The huge pile of STs by the Contractor unit makes clear they are shell-shocked: 13 is well over 3x their unit discipline of 3. This means they automatically fail discipline checks, including this CQ discipline check. Therefore, the remaining Contractor must retreat.
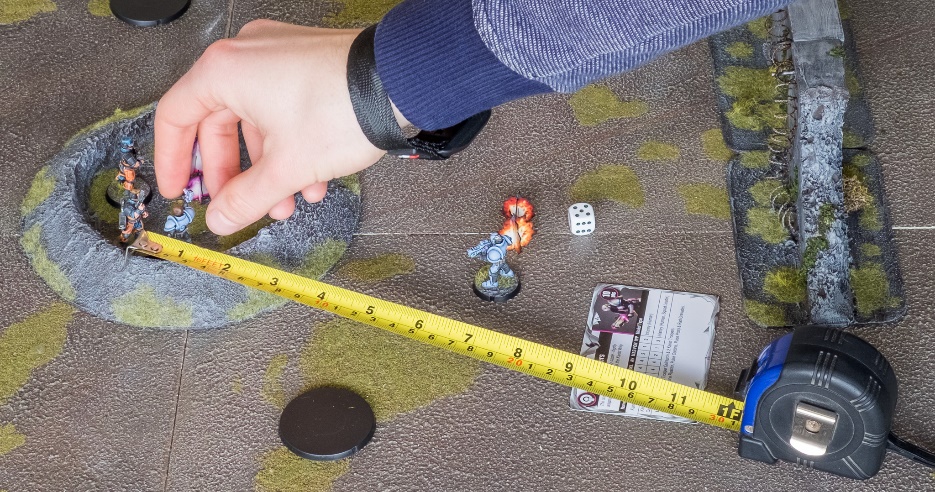
 3.2.5) Charge results: the remaining Contractor is too suppressed to pass his discipline check and therefore cannot fight back; he must retreat. His forced double move takes him 12" away from the nearest Karists (we'll see why soon), after which he decides to become pinned.
The Karist player finishes the Charge Action by shaking-off a suppression token. As this was the first activation in the turn, the Karist player must now let the Epirian player activate one or two of his units.
3.2.6. Retreats
A retreat basically means you must use a double move to get away from the charging unit. You may move anywhere you like, but you cannot end further away from your own table edge than you started. Also, if you end the retreat within 6" of the unit that just defeated you at Close Quarters, or 12" of another enemy, your unit is destroyed. At the end of the move, the retreating unit must choose to be either pinned or, if not taking cover, on the move. Open ground bonus movement may be used, but the unit isn't obliged to.
Our Contractor unit now consists of only the squad leader, who must move at least 6" away from the Karists that charged him to prevent being destroyed. At the end of this move he chooses to be pinned, so we place the appropriate token. The Karist unit stays behind, now at 7 STs. However, as its Charge Action now ends, it gets to remove D3 STs. The Karist player rolls and gets to remove 1 ST, leaving the unit with 6. An 'activated' token is placed by the unit and then we move on to the next activation. As this was the first activation of the turn, the Karist player cannot activate another of his own units, he must now let the Epirian player activate either 1 or 2 units.
 3.2.6) How the battlefield looks after the Karist unit charged the Contractors in the crater. The Contractor unit is down to one man and had to retreat, suffering under a huge pile of suppression tokens.
3.2.7. Reactive CQ Fighting
If the target did not retreat, it gets to fight back, fighting in the same way as the charging unit did. Note that although they are in the crater, the Karist unit would not be allowed to benefit from cover if the Contractor unit had not retreated and instead performed reactive CQ fighting: reactive CQ fighting ignores cover.
When neither unit retreats as a result of the fighting, the units stay in place, facing off. They are free to act normally when they next activate, and also free to be shot at by other units, although they count as fleeting targets.
3.2.8. Failed Activation Discipline Checks
The Epirian player suffered quite a blow as a result of that charge. It's now his turn to activate, and he chooses to activate the Epirian Contractor unit which just retreated. We remove the pinned token and continue to the unit activation check. The unit is still at 13 STs, so automatically fails its check.
When a unit fails its activation check, it must perform one of two actions. If the unit has fewer suppression tokens than its discipline value, it must perform a Dig-In action as explained before. If the unit has suppression tokens equal to or higher than its discipline value, the unit must perform a Shaken action, which we've not yet seen. The lonely Contractor obviously has more STs than its discipline value of 3, so it must perform a Shaken action.
3.2.9. The Shaken Action
When performing a Shaken action, you must check whether there is an enemy unit within 12". If there is, your unit must retreat. If not, you may still retreat if you want, but you can also choose the unit to become pinned and then fire a round of wild shooting (but only at the nearest target, because it's pinned). When finishing the action, the unit gets to shake off an extra D3 STs, so that's 2D3 if the unit didn't end its action pinned and 3D3 if it did.
Our Contractor is not within 12" of any enemy, so he stays put and becomes pinned again. He also fires a round of wild shooting at the Karists that just charged him, but he doesn't manage to hit. To end his Shaken action, remove 3D3 STs: 2D3 for the Shaken action, and 1D3 for being pinned. The Epirian players rolls the dice and the result is that he can remove 6 STs. This leaves the unit at 7, which is still quite a few, but at least the Contractor is no longer shell-shocked.
3.2.8) The board after the Contractor finishes his Shaken Action.
3.3. End Phase - Destroying Units
Only half the units have now been activated in this turn, but we've now covered all types of action! At this point, we're going to end the walk-through, with just a few more words about this second turn's end phase: if the Epirian player feels the effectiveness of his now 1-man unit is too depleted, he can choose to destroy the unit in this turn's end phase and attempt to bring the whole unit back as reinforcements in a later turn.
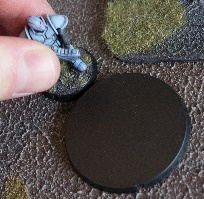
 3.3) The Epirian player may choose to destroy his depleted unit in the end phase of the turn, in order to bring the whole unit back as reinforcements in a later turn.
4. Scoring Victory Points
Finally, a short word on VPs. If the Epirian player chooses to destroy his unit in the end phase of the second turn, the Karist player will score points. Remember the sequence of the end phase:
- Destroy units
- Count VPs
- Retrieve command points
4.1. Conditional Points
Counting VPs happens ÃÆáfter destroying any units. If the Epirian player destroys his depleted Contractor unit, he will be down to half his force. This means the Karist player scores 5 points for the Decimation objective. However, these VPs are of the conditional type, as mentioned on the mission card. This means you will only have these points as long as you fulfil the conditions. As a result, the Karist player would lose these 5 points again when the Epirian players brings back his unit as a reinforcement later (and still has his second unit).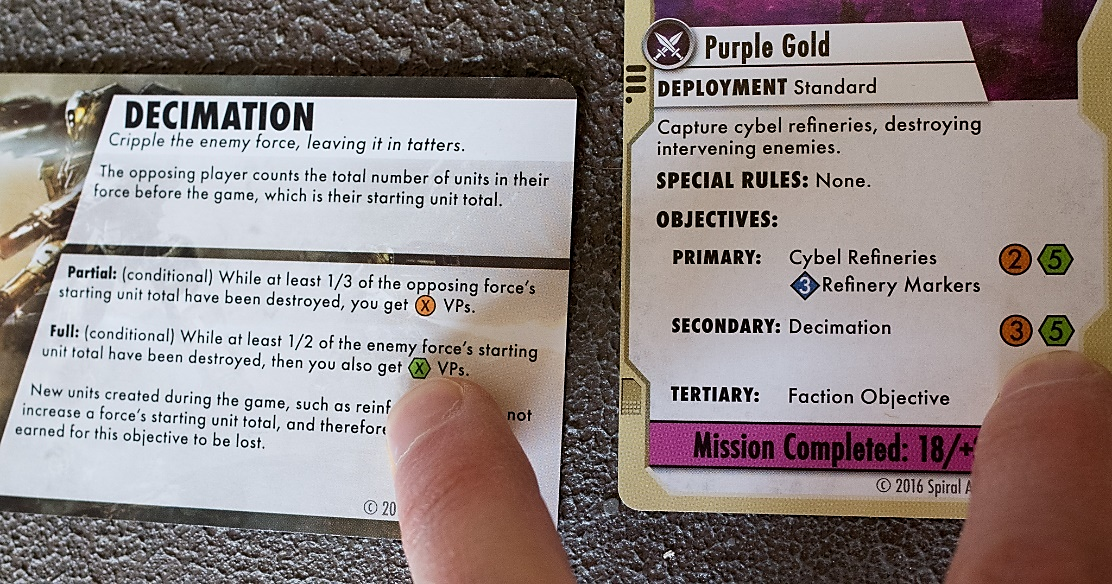 4.1) The Decimation objective awards conditional points: you get 3 points as long as the enemy is down to two thirds of the number of units it started with, and another 5 points when (and as long as) he gets to half the number of units.
4.2. 'Each End Phase' Points
In contrast, the Cybel Refineries objective's points are marked as 'each end phase'. Any points you score for this objective stay yours, even when you lose contact with a refinery marker later. Some of these points may also be scored in the end phase of this second turn, when either player manages to move a unit in contact with one of the markers we placed ÃÆánd there is no enemy unit within 3" of that same marker, thereby controlling that objective marker. For each marker in your control in a turn's end phase, you get 2 points if you're in turn 1, 2 or 3, and 4 points in turns 4 and 5.
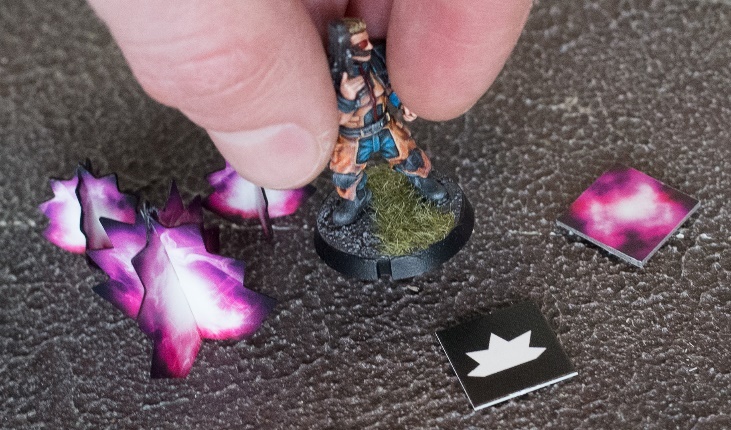
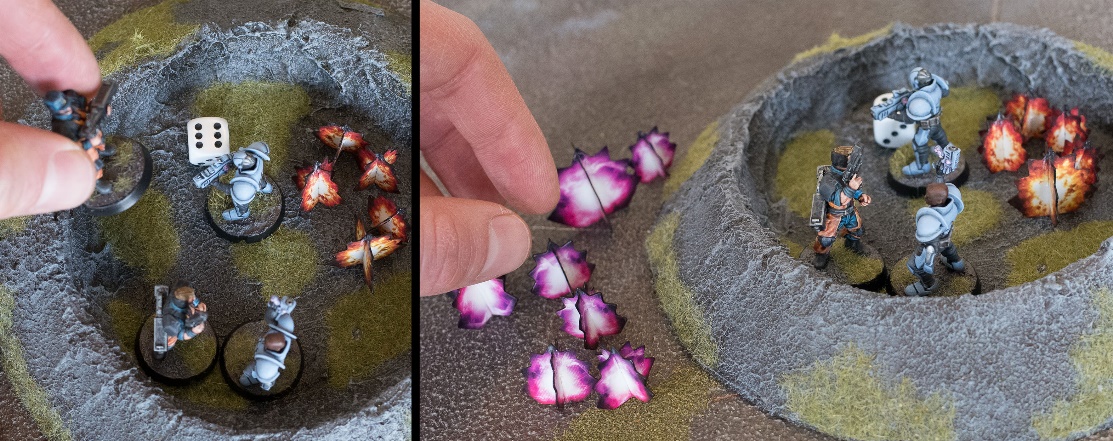
 4.2) To control an objective marker, a model in one of your units needs to be touching the marker, and there can be no enemy within 3" of the marker. Shell-shocked units cannot control markers, and neither can units that are on the move.
For the Purple Gold mission, if, in any turn's end phase, including the fifth turn, either player has at least 18 points and is at least 3 points ahead of his opponent, he completes the mission and wins the game. (So, this could be 18 vs. 15 points, or 22 vs. 19, but not 12 vs. 9 or 18 vs. 16.)
4.3. End of Game Points
The third and last type of points is end of game, this is the type of the 'full' Cybel Refineries objective. These points are only counted when the game lasts the full 5 turns without one player finishing the mission in any end phase. After these points are added, you may still get a winner. For example: after turn five's end phase, the Epirian player has 19 points and the Karist player has 17. This means there is no winner. However, say the Karist player at this point holds 2 of the 3 markers whilst the Epirian player holds just 1.
This means the Karist player now gets awarded the points for achieving the 'full' Cybel Refineries objective, bringing his total to 22 and winning him the game. The minimum score is dropped when it gets this far, so the Karist player would also win if the score were 17 vs. 14 in his favour, but if it were 17 vs. 15 it would be a draw, as the minimum margin does still count.
 4.3) The mission dictates that the Cybel Refineries objective awards 2 points for every controlled refinery marker in turns 1 to 3, and 4 points in later turns. If neither player has completed his mission after 5 turns, the objective also awards 5 points if you control at least half the refinery markers, which could turn defeat into victory! Note that with my finger I cleverly blocked the bit of the mission card that says how many points you need to be ahead of your opponent in order to win. If you grab the card, you'll see it says '+3'. So, to complete the mission, you need to have 18 points, and 3 more than your opponent.
5. Closing Remarks
Just a few final words. We've tried to show in this tutorial as many of the basic rules as we could reasonably fit. We've showcased all the actions in the game and the various ways to victory each mission provides. The actual game we used for this tutorial wasn't quite fair, as the two Karist units add up to 20 points, whilst the two Epirian units are only 14. It's also not quite representative as in a usual game of about 150 points you will find many more units and abilities that will give you plenty of tactical options. The Command Point mechanic that we left out in this tutorial is quite important: it functions to remove STs from units, which can be very useful, as we think will already be apparent from this tutorial, and to bring back destroyed units. There's also a bit more to say about terrain, melee weapons, and various model types. We also left out the tertiary faction objectives, which adds another way to score Victory Points. Despite these shortcomings, this tutorial covers a lot of ground and we believe tackling the rulebook will not be such a daunting task once you've seen the basics presented in this tutorial. Maelstrom's Edge is a game with a lot of depth, so if you have any questions, we're always happy to help!
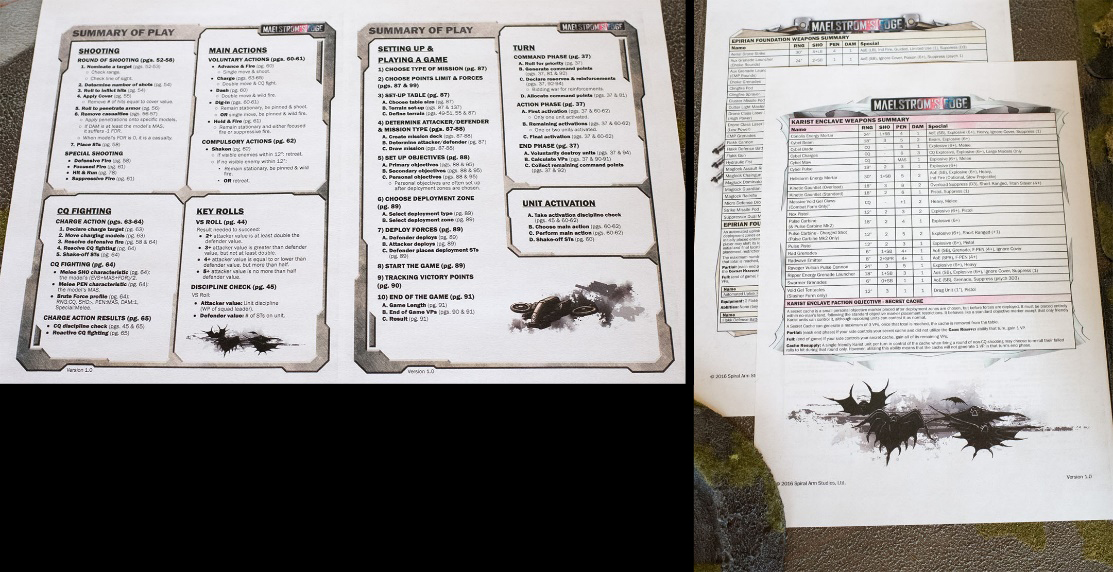 5) Download the free reference sheets from maelstromsedge.com to have key information quickly available during your games.
