


A Walk-through of The Maelstrom's Edge Tabletop Game
Any tabletop miniatures game with forces that can be extensively customized has the potential to produce some complex gaming situations. Our rulebook is written to provide solutions to whichever situation may crop up, so that players won't have to wonder 'what to do now' or 'which rule counts'. As a result, the rulebook can be a bit intimidating for a first time reader, with content aimed to cover all possible situations.
To make it easier for a new gamer to learn the rules, we've drafted this rules walk-through which aims to be a less daunting read than the full rulebook may be if you're new to the game. This tutorial battle will teach all the basics: how to set up a game, how to activate units, how to move and shoot, the terrain rules and how to win! We assume you have a rough idea of the basic game premises, as can be gleaned from the introduction in the rulebook (pages 2 and 3) or the 'rules' section on our website. It also helps to go through the 'Core game concepts' on pages 38 to 42 of the rulebook, particularly if you're new to tabletop miniature games. If you have a table with some models and terrain to hand, you can follow right along with this walk-through if you like. If not, no problem! Just reading along will teach you the basics.
We recommend you Download the PDF version of this walkthrough if you find the font or format of this page is not to your taste, or if you want a printable version.
1. Setting Up the Game
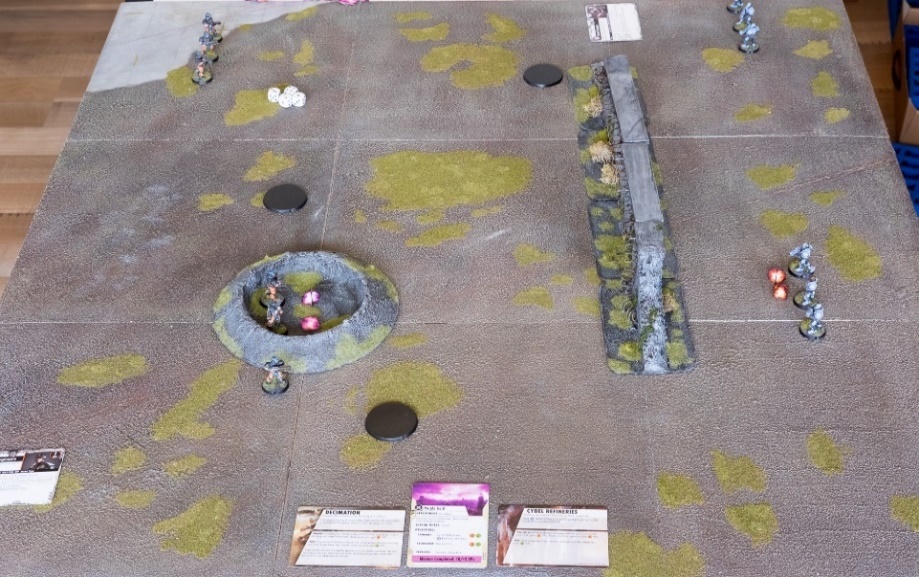
A normal game uses a space of ideally 6' by 4'. For this tutorial we'll claim an area of about 3' by 3'. Here's what else we'll be using:
1) A piece of crater terrain (this could also be a forest, ruins or other scrub or detritus);
2) A wall (this could also be a building, or a stack of crates);
3) Two units of 3 Contractors for the Epirian side;
4) Two units of 3 Troopers for the Karist side;
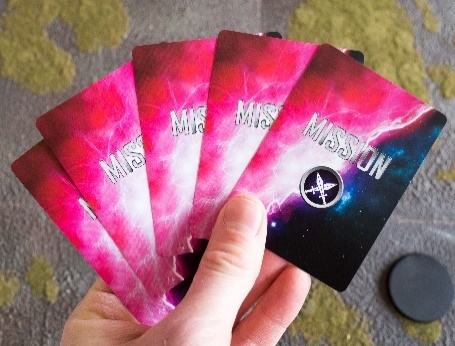
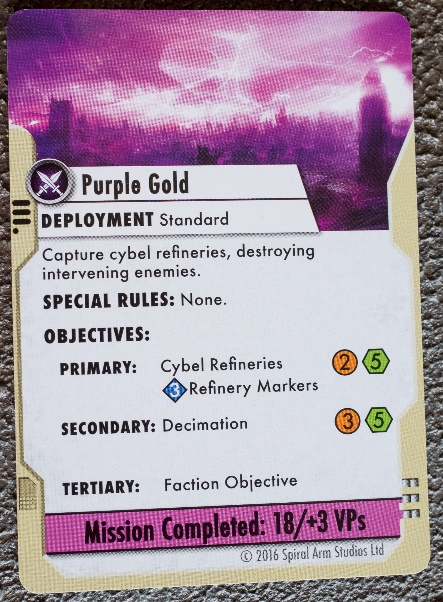
5) Mission and objective cards, specifically the Purple Gold mission, as well as the downloadable reference sheets;
6) 3 large, 46mm objective markers (we used some large bases from the box);
7) The supplied dice and tokens, an imperial measuring device (inches/feet), drinks and cookies (essential).
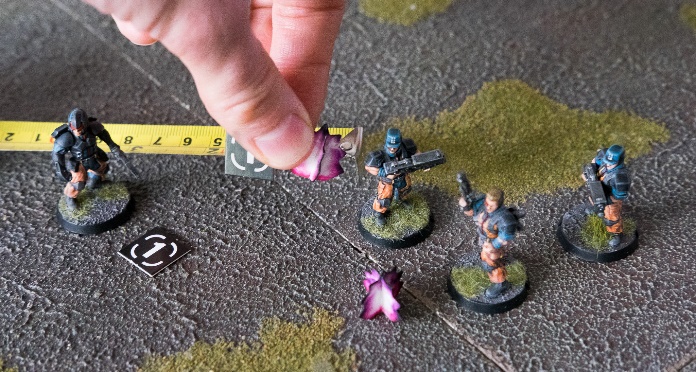
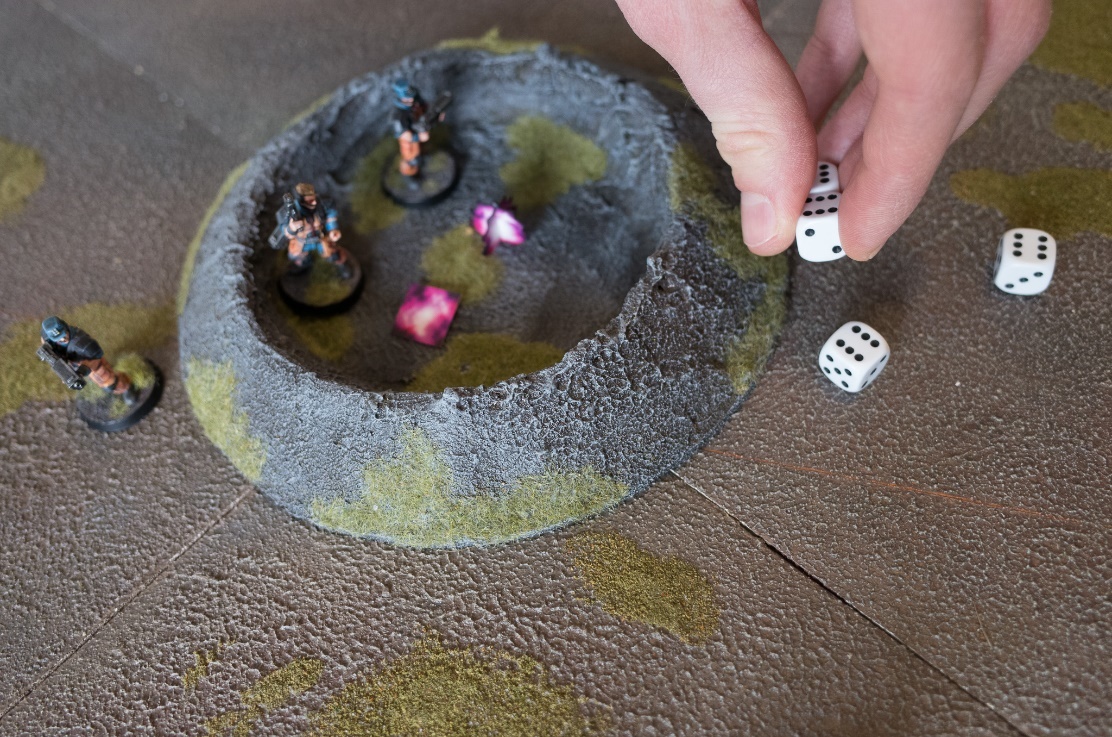
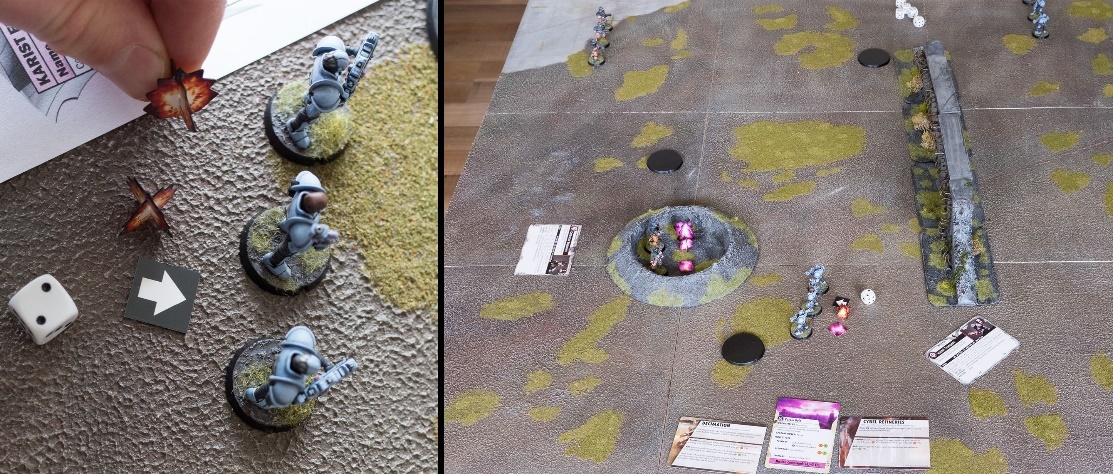
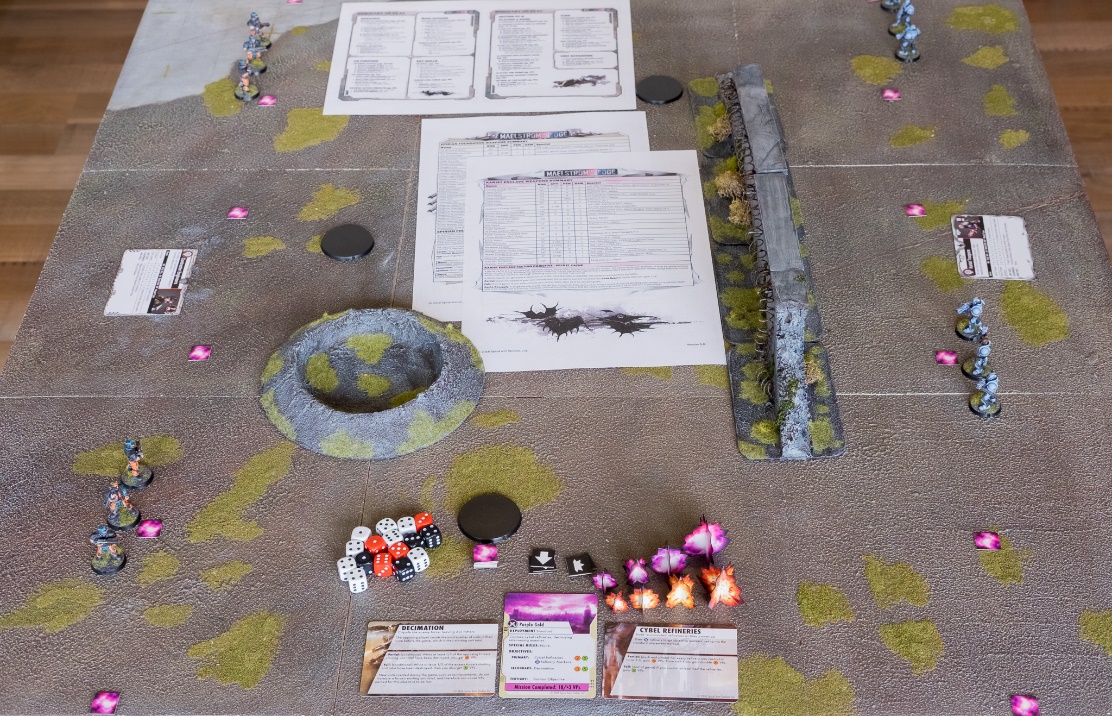 1) Items used in this walkthrough: board, terrain, models, markers, dice, tokens, cards and reference sheets.
1.1. Set Up Terrain
The terrain was set up as shown above in the overview image. Normally you'd set up terrain in agreement with your opponent or by the procedure detailed in the rulebook appendix, and then have a word about the terrain classifications. Let's do that last bit now.
We have two pieces of terrain; let's start with the crater. This piece we'll designate as area terrain. The other piece, the wall, we'll designate as an obstacle. These are the two main terrain types in the game. The main difference is that you can be inside area terrain, meaning you can enter it, but you cannot be inside an obstacle. You can be on top of it, but that's not the same as being inside. Buildings are obstacles too, though if you choose you may use the specific Building rules that do allow models to enter them. They will, however, still count as obstacles.
Both area terrain and obstacles will grant units cover. A model takes cover when it touches an obstacle or is inside of area terrain. It's really important to be taking cover or be 'in cover' in Maelstrom's Edge, as it will allow you to shake off the worst of your opponent's firepower. We recommend using loads of terrain on your table, a lot more than we use for this simple tutorial.
Besides determining whether a terrain piece is area terrain or an obstacle, you also need to assign it a cover value. A higher value offers more protection. If you deem the terrain to only give a little protection, it gets cover value 1, a 'standard' level of protection would mean cover value 2, and specially fortified positions get cover value 3. Both our terrain pieces get cover value 2.
Finally, you'll need to decide if the terrain is dangerous to move through, in which case units will become suppressed when they do. For this tutorial, let's assume the terrain is not dangerous.
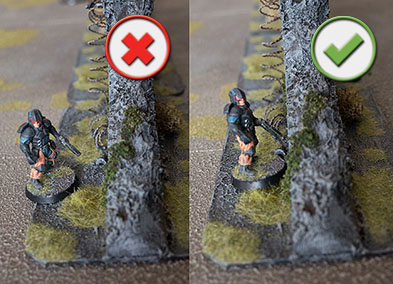 |
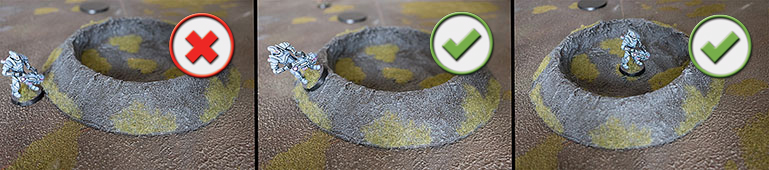
1.1) To take advantage of area terrain (the crater), models need to be inside it, that is somewhere on its base. To take advantage of obstacles (the wall), models must be touching them. Also, with regard to obstacles: if the enemy were to approach the Bot Handler from behind, he would get no advantage from the wall. After all, he'd be in clear view! (This is called 'denying cover' in the rulebook.)
|
1.2. Determine Mission, Attacker and Defender
The next step is to determine which mission you'll be playing, who will be the attacker and who will be the defender.
First, you shuffle the deck of mission cards. Next, you have a bidding war with your opponent. You each bid a number in secret, which can't be zero. The highest bidding player will be the attacker. This bid is the number of suppression tokens (STs) the defender can place on the attacker's units before the game commences, to show the effect of damage and anxiety the attacking units suffer as they approach the defender's position. For the purpose of this tutorial, the Epirian player bid 3 and the Karist player bid 1. This makes the Epirian player the attacker, but the Karist player gets to place 3 suppression tokens on his opponent's troops before the game starts. Next, the attacker draws a card from the mission deck, deciding what will be the mission for the game. The Epirian player draws the 'Purple Gold' mission.
 | 
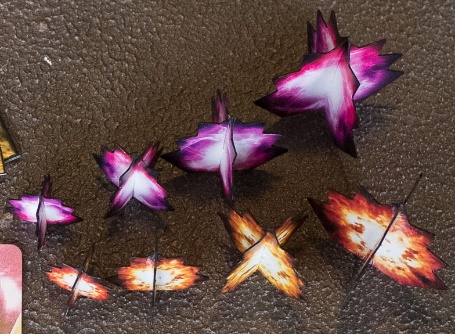
1.2) Mission cards, four sizes of suppression tokens (1, 3, 5 and 10), and a bidding war using command point tokens.
|
 |
1.3. Place Objective Markers
The object of the game is to score more points than your opponent and at least as many as the mission requires. The mission card tells you how many points you need to outplay your opponent by and how to achieve them. If one player reaches a pre-determined number of points and has enough of a lead over his opponent, the game automatically ends. Otherwise, the victory point totals after 5 turns will decide the winner.
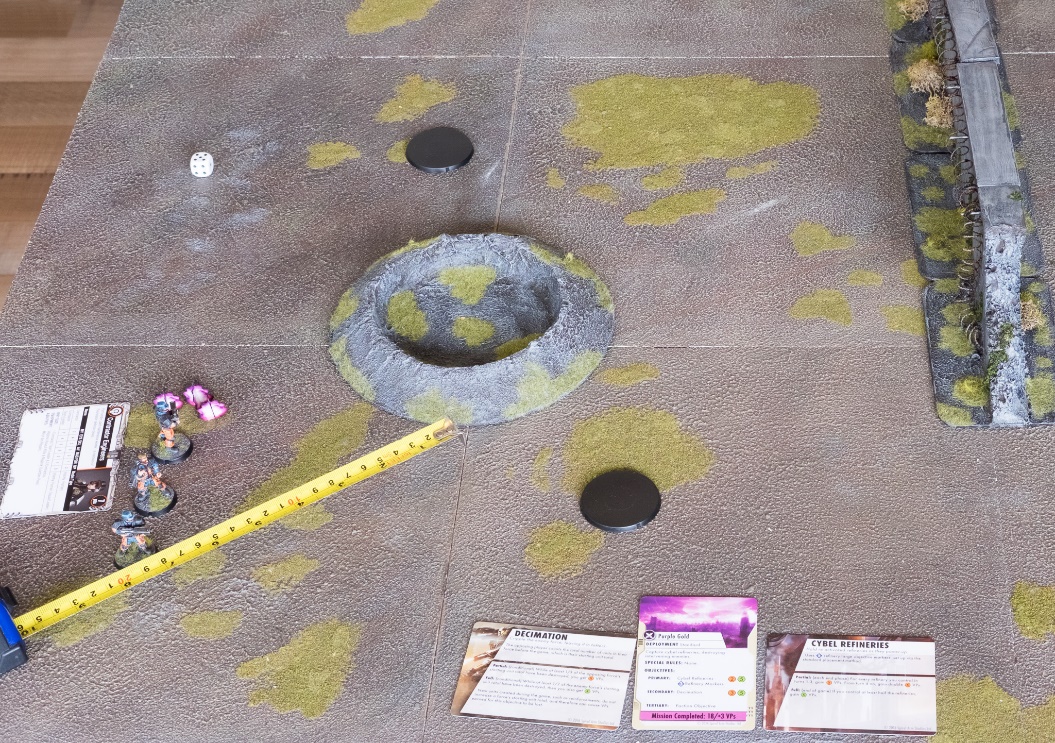
To earn points, the mission designates several types of objectives, which we'll now have to set up. Each mission has primary and secondary objectives, and faction-specific objectives as tertiary. Purple Gold uses the Cybel Refineries primary objective and the Decimation secondary objective. The Cybel Refineries objective is about claiming marked positions on the table with your troops, which you do by moving them into contact with the markers. You get points each turn for every objective you control, extra points in the last few turns and, if the game is still undecided after 5 turns, another set of points if you control at least half the markers.
Let's place the markers for the Cybel Refineries objective now. The mission specifies we need three markers. The defender (the Karist player) starts putting down one marker, then the attacker places the next, and finally the defender places the last marker. There are rules to ensure the markers become spread out over the board and are located in spots you can actually reach. Our markers got placed as indicated on the overview image (image 1). The secondary objective on the Purple Gold mission card is Decimation. This will grant you points when you've destroyed one third of the opponent's force and more points when you've destroyed half. We don't need to place any markers for this objective. We'll ignore the tertiary faction objectives for this tutorial. So, to summarize: you can win the mission we selected by bringing your troops into contact with the Cybel Refinery markers we placed, scoring points each turn, and by destroying your opponent's force. Outpace your opponent earning these points, and victory is yours!
 | 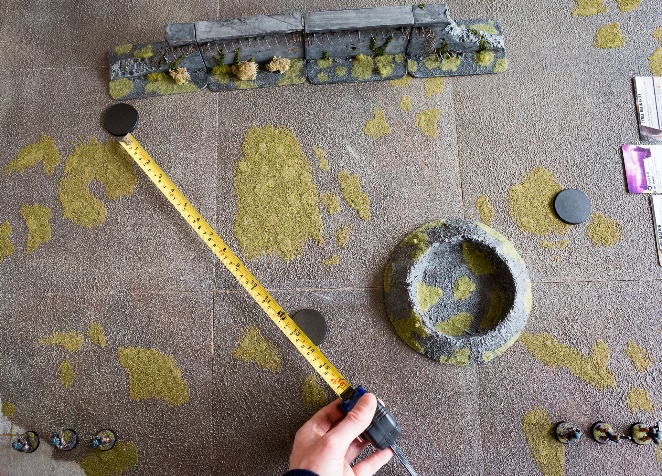
1.3) The mission specifies how many objective markers we need. Markers need to be placed 12" apart and 6" from the edges.
|
1.4. Deploy Forces
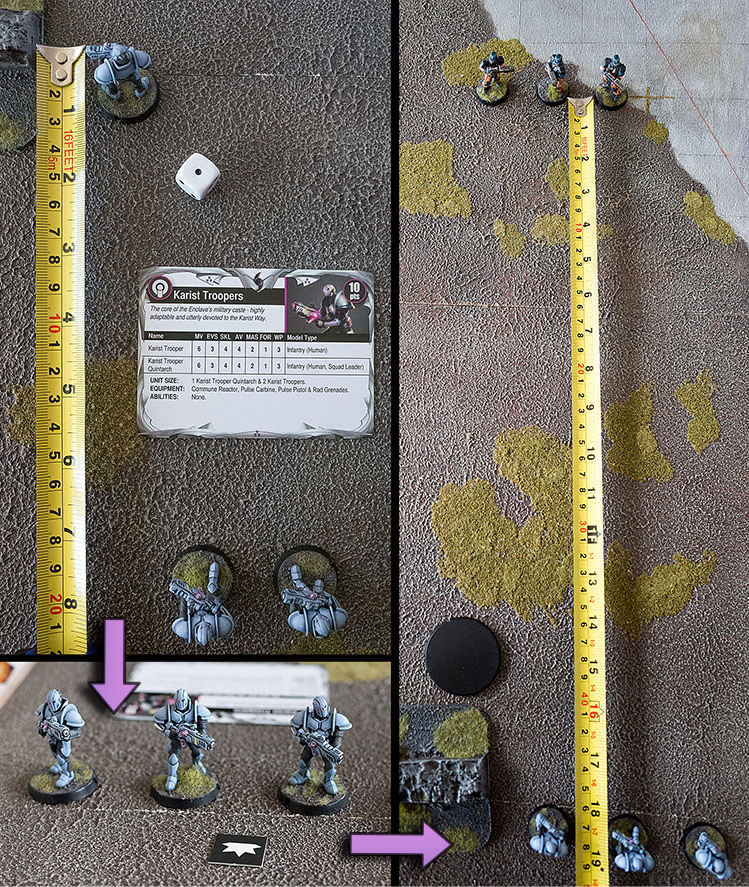
Next, you decide deployment zones. The (Epirian) attacker rolls a D6 (a standard six-sided die). 1-3 means 'pitched deployment' and 4-6 means you get 'big flank'. Each deployment type features two deployment zones, one for each player (shown in image 1.4 on the next page). Both players then roll a D6 again: the highest scorer decides which of the two zones he wants. Our Epirian attacker won and selected the left zone.
Once deployment zones are determined, it's time to deploy your forces. The defender first deploys his entire army, though you can keep any units in reserve, or even all of them, so they will show up from your table edge in a turn you choose. You can also choose to deploy your units as being pinned, which means they gain a defensive bonus, but are not as flexible on the attack. We'll talk about being pinned later. When the defender is done, the attacker sets up his force. Again, the player is allowed to keep any units in reserve. The attacker may also choose to deploy units on the move, which means they're harder to hit but don't fire so accurately. Our two mini forces were deployed as shown on the overview image opposite. We made sure to clarify which of the models in each unit is the squad leader (the middle model in each unit in this case), and made sure every other model faces the same way he does.
Finally, the defender places the suppression tokens he gets to allocate as a result of being the defender in the deployment bidding war. Our Epirian attacker bid 3, so the defender gets to place 3 tokens. The Karist player places them all on the Contractor unit near the crater.
The game is now set up, we're ready to go!
To summarize:
1) We set up terrain and discussed what it is;
2) We selected a mission and determined who will be attacker and defender;
3) We went through the mission objectives and placed the required markers;
4) We determined deployment zones and deployed our forces.
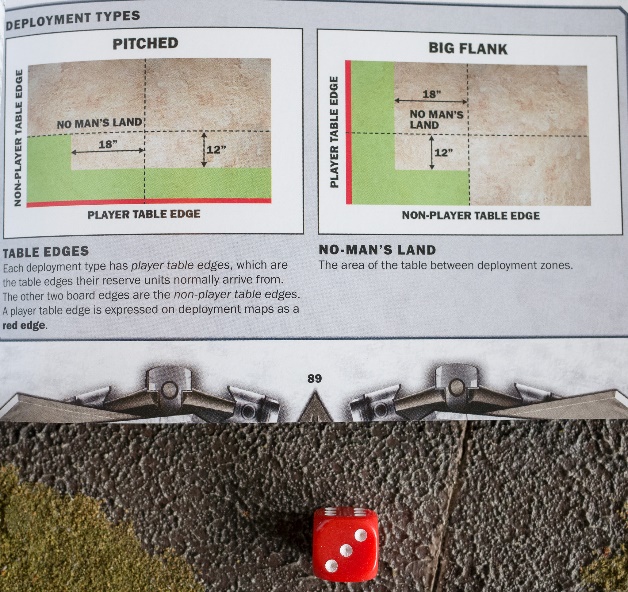 | 
1.4) Left: An image from the rulebook showing the two deployment types. Our small tutorial table doesn't allow the L-shape normally used. You can see the deployment zones marked by lines of purple tokens in image 1. Above: As a result of the bidding, the Karist player places 3 STs on the Contractor unit.
|
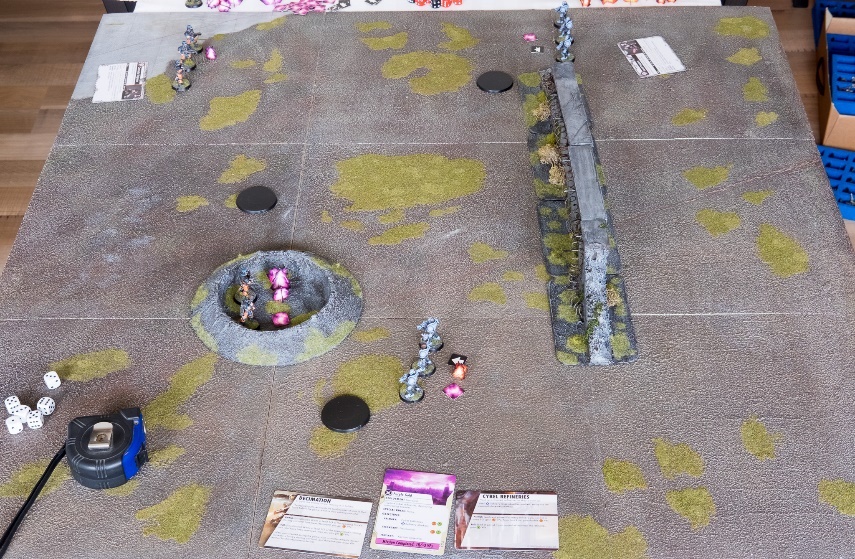
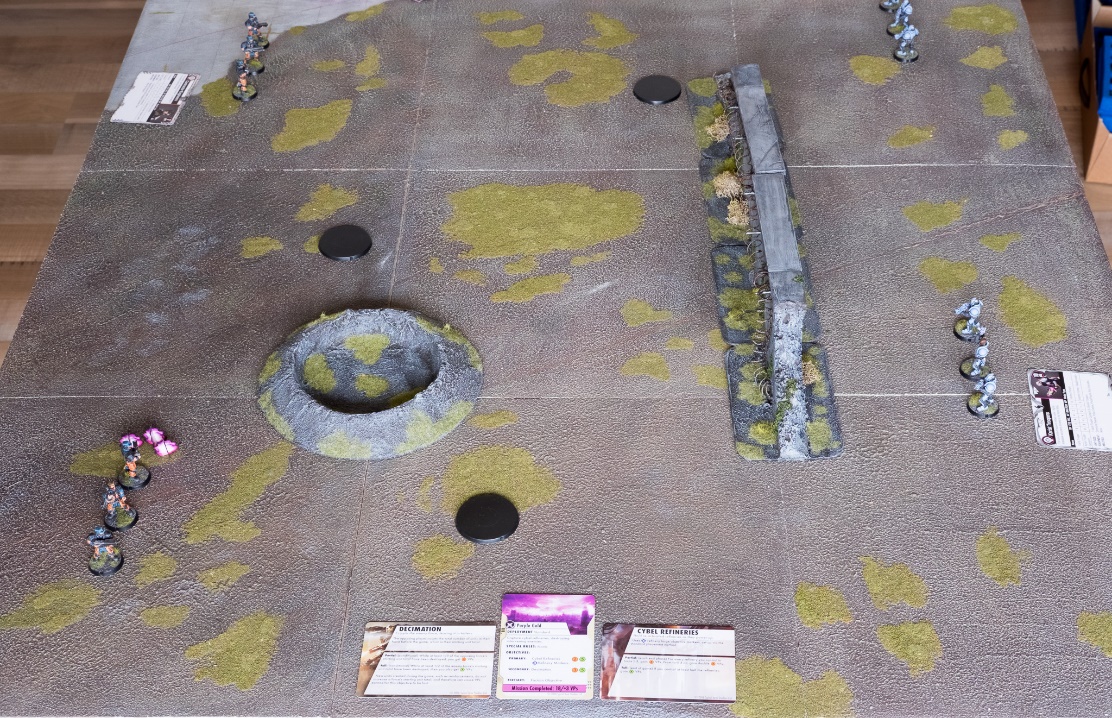 2) The table all set up for the start of the game.
2. The First Turn
The game will end after 5 turns, or when either player finishes the mission. In one turn, both players act, so it's not like there will be 5 turns for the attacker and 5 for the defender, no: 5 turns, in which both players alternate activating their units. So, in one turn, every unit from both players is activated one by one. When every unit in each force has completed an action, the turn ends.
2.1. The Command Phase
Each turn has three phases: the command phase, the action phase and the end phase. In the command phase, four things happen:
1) The priority player is determined;
2) Command points are generated;
3) Reserves and reinforcements are declared;
4) Command points are allocated to command models on the table.
As this tutorial doesn't include command models or reserves, we'll only concern ourselves with determining the priority player. However, for a rough idea of how the other steps work, we touch upon it below.
So, what does it mean to be priority player? Quite simple: whenever both players have to do something at the same time, the priority player does it first. This means the priority player cannot react to the opponent's actions, so it's actually often a disadvantage to be the priority player. However, the priority player may also be able to press an immediate advantage. The priority player is also the player who starts activating units.
In the first turn, the attacker is always the priority player. In following turns, players 'roll off', that is players each roll a die and compare the result: the winner, the player who rolled highest, decides if he wants to be priority player or not.
Once the priority player has been decided, command points are generated. Every Command model on the table generates a number of command points for his owning player. The better his command ability, the more points. The turn number is added to the total for each player. The generated points form a command point pool for each player. Unused points remain in the pool across turns, so you can save up if you want.
Next, each player declares if he wants to bring in any units from reserve this turn. These units are placed near the table and may be activated this turn, at which point they'll move onto the table. Players can also try to bring on reinforcements. Reinforcements are units that have been previously destroyed in the game. Each destroyed unit may be brought back once per game as a reinforcement, but this isn't free. If you want to bring back a unit this way, you need to bid a number of your command points. The opponent can prevent the reinforcement from arriving by bidding equal or more points. If you win the bid, the reinforcement unit arrives just like reserves. Finally, in the command phase, you may allocate any remaining command points in your pool to Command models on the table. Each Command model has a Willpower value which decides how many points they may get allocated. During the turn, the models will use these points to help out nearby units that have become unreliable through suppression. They do so using orders.
Orders
Command models can give orders. We're not using any Command models in this walk-through, but the mechanic is important enough to warrant a basic explanation. Every time you intend to activate a unit that has STs on it, you can check if there is a Command model within 18". If there is, you can have the Command model give an order to the unit before it takes its activation discipline check. To do this, simply discard a number of command points from the Command model, and discard as many STs from the unit you want to activate. The unit then takes its discipline check, which will now be easier to pass, if you removed sufficient STs.
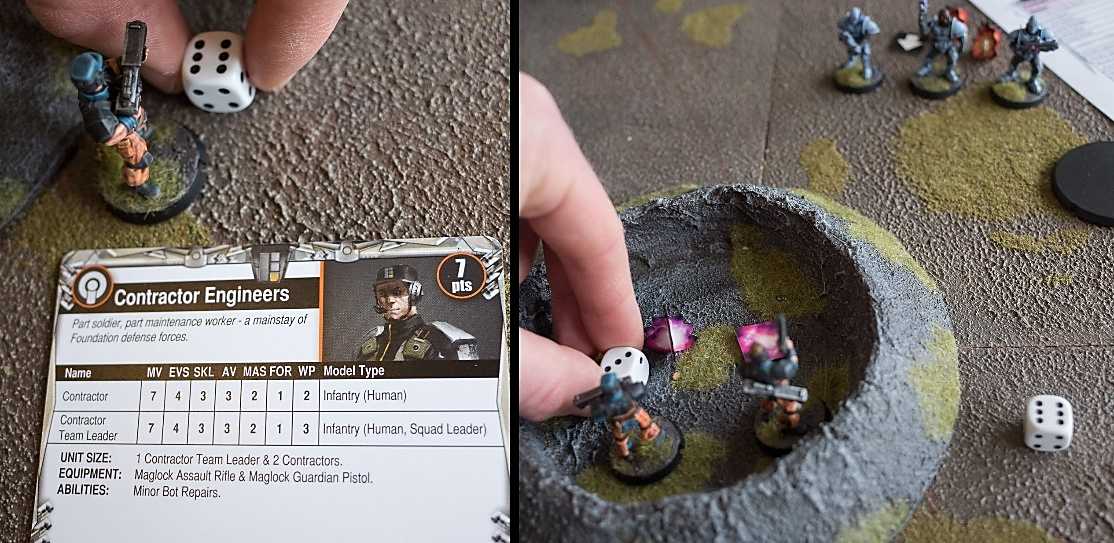
 2.1) The Epirian player wants to activate his Contractor unit. The unit currently has 2 STs on it. Because the squad leader's WP is 3, the unit will pass its activation discipline check on 3+. However, the Epirian player has something important in mind for this unit and really wants it to pass the check. The nearby Bot Handler is easily within command range. By expending 1 command point, he removes 1 ST from the Contractor unit that will now pass its check on 2+.
2.2. The Action Phase
As priority player, the (Epirian) attacker gets to begin the action phase! This is the part of the turn where you use your units. The priority player starts by activating one of his units and performing an action. There are various actions players can choose or may be compelled to perform with the activated unit. Generally, they combine a movement and a shooting element. Activating a unit encompasses the following four steps:
1) Activation discipline check;
2) Choose action;
3) Perform action;
4) Shake-off suppression tokens.
2.2.1. Activation Discipline Check
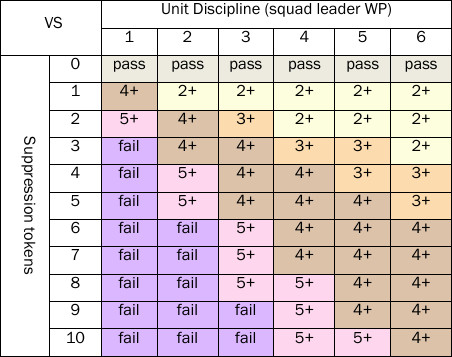
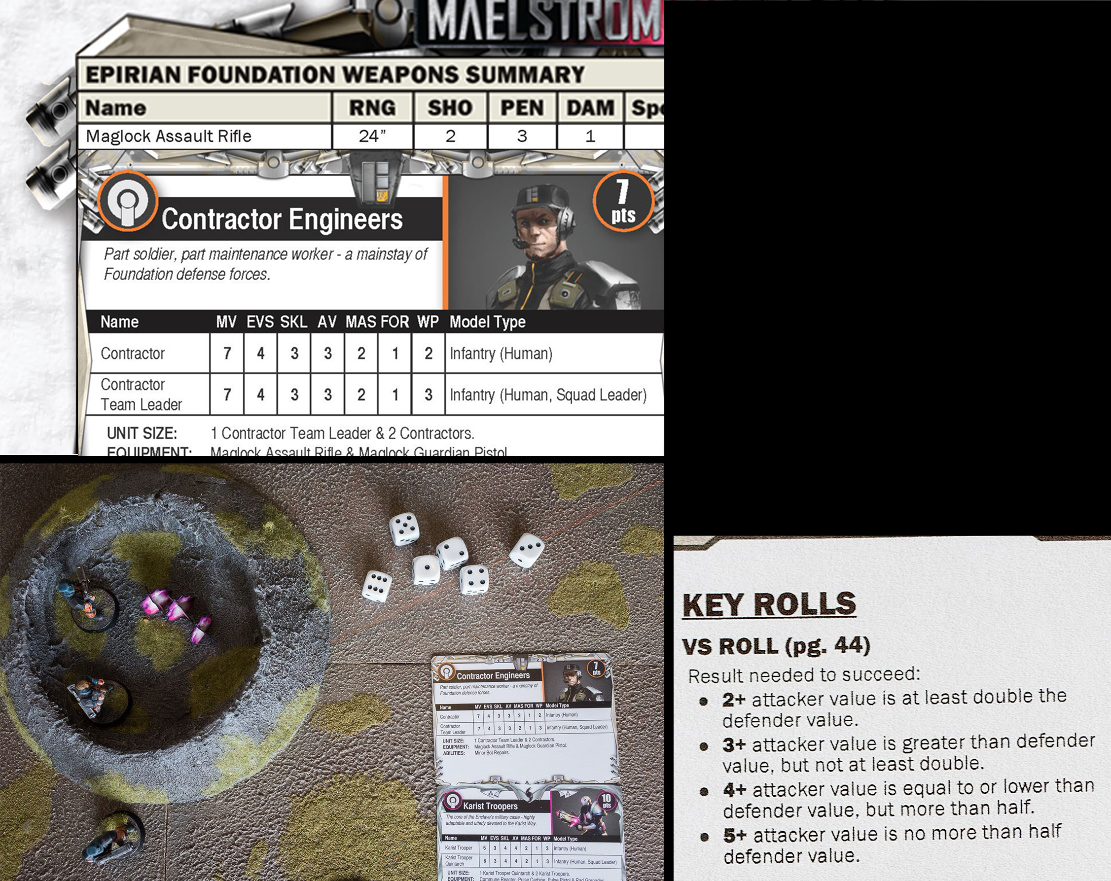
The first thing to do is to select one of your unit to activate. The Epirian player selects the Epirian Contractors afflicted with suppression tokens. To activate a unit, you need to take an activation discipline check. To do so, compare your unit's discipline, which is the squad leader's Willpower characteristic (WP), against the number of suppression tokens currently on the unit and roll a die, using the versus roll (VS roll) table depicted in image 2.2.1. This means that to pass the check, you need to roll 2+ (that's 2 or higher) on a D6 if your discipline is double the number of tokens or better, 3+ if it's more but not double, 4+ if it's equal or less and 5+ if it's half or worse. If there are no tokens on the unit, you can skip this check as you'll pass automatically. However, if the amount of tokens is at least 3x your discipline, you are shell-shocked and automatically fail any discipline check, that is any check where the squad leader's WP is compared against the number of STs on the unit.
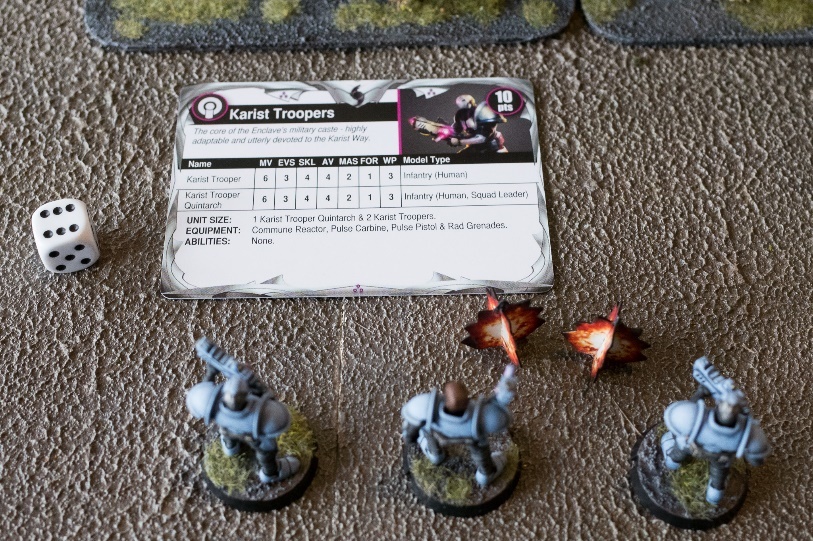
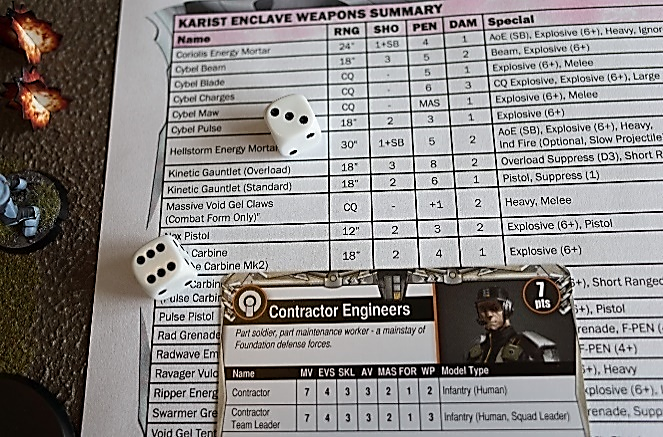
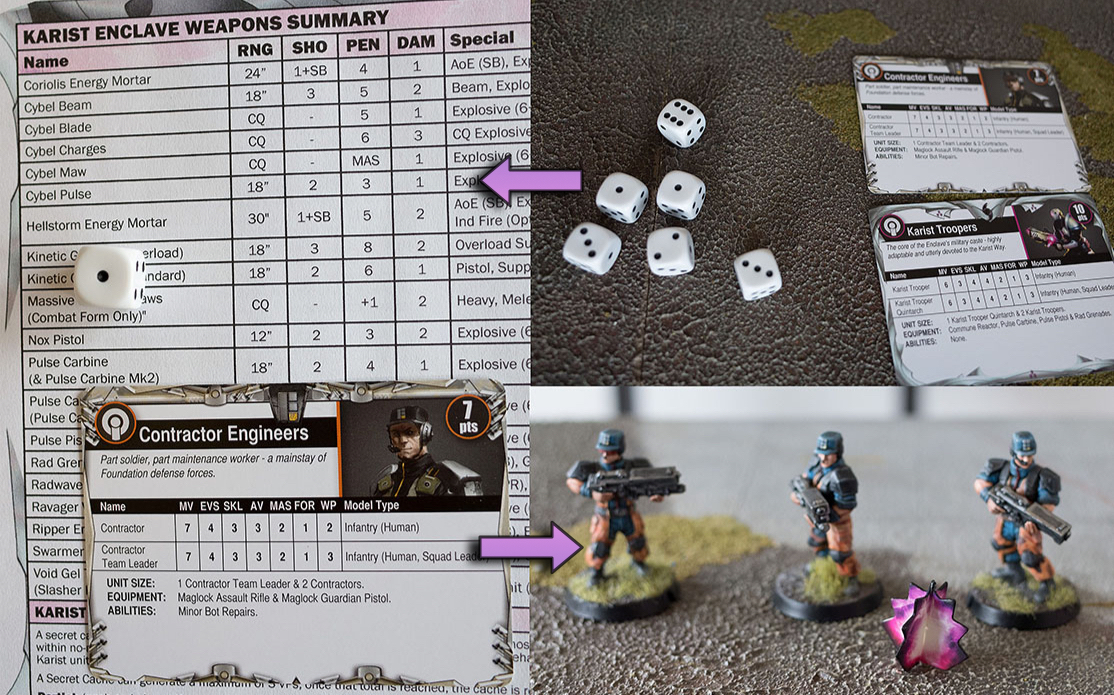
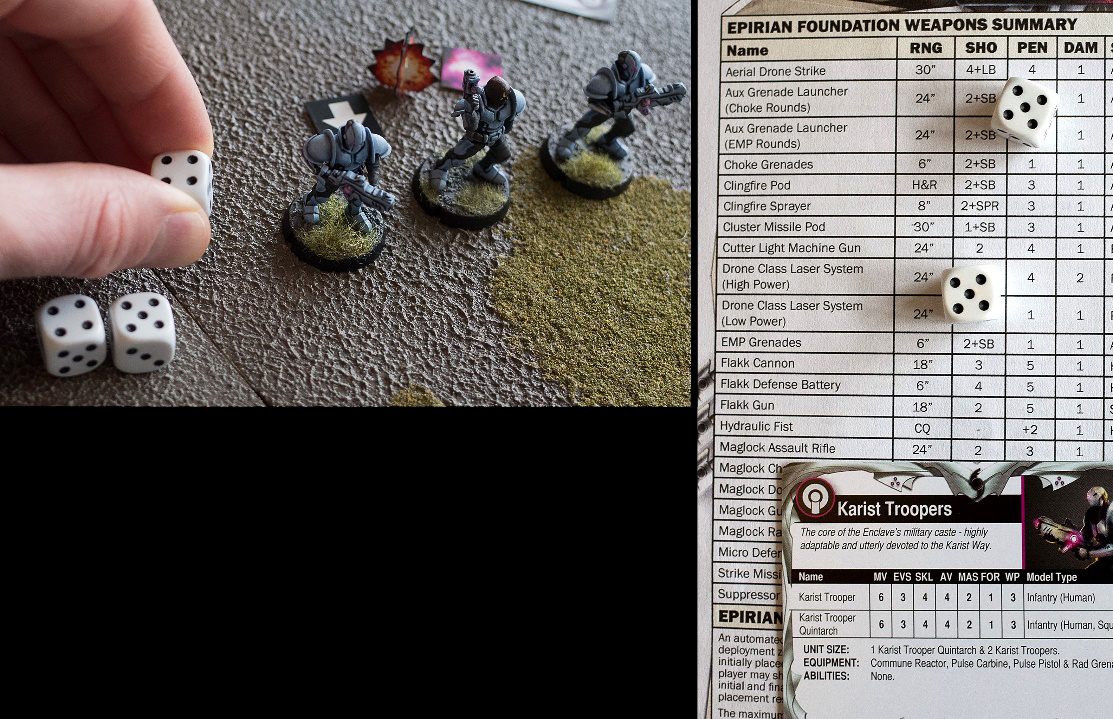
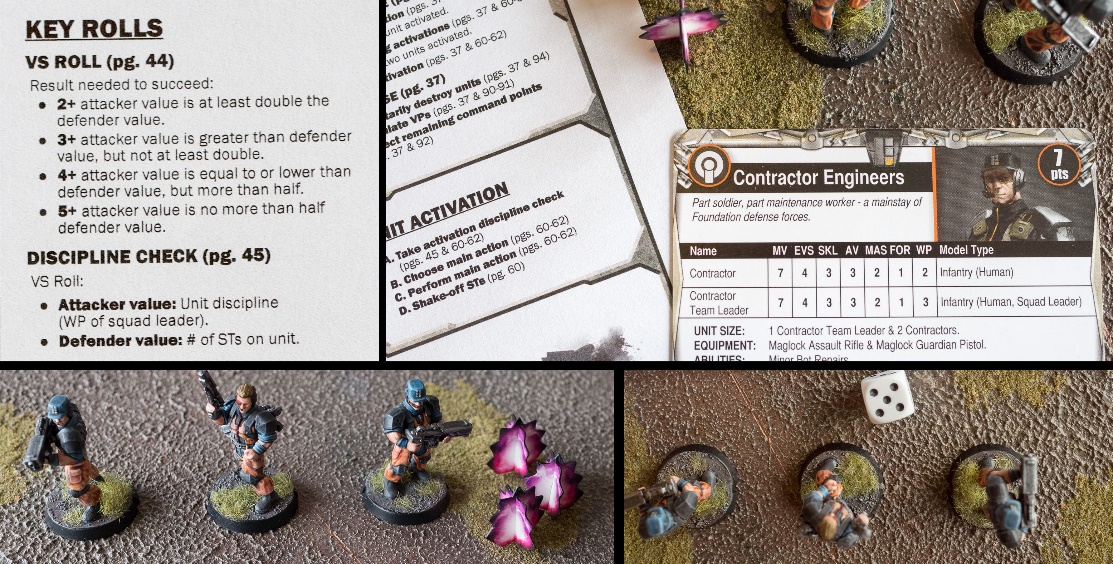 2.2.1) The VS-roll system as shown on the summary of play sheet, the unit activation procedure from the same sheet, and the Contractor's unit card give all the information you need. The Contractors compare their discipline of 3 (their leader's WP) vs. 3 tokens, need to roll 4+ to pass, and score a 5!
So, let's see how this works. The squad leader of the selected Contractor unit has a Willpower of 3, vs. 3 tokens on the unit, which makes it a tie. With equal values on each end of the versus roll, the Epirian player needs to roll a 4+ to pass the unit activation check. Had there been 0 tokens, he'd have passed automatically, for 1 token he'd have to roll 2+ (as 3 is more than double of 1), for 2 tokens a 3+ (more but not double), and from 6 tokens a 5+ (as 3 is only half of 6). At 9 tokens or more, he would automatically fail the check. Below is an example chart showing common Willpower values and numbers of tokens, with the result needed on the VS roll to pass the discipline check. You won't find this table in the rulebook, it's just to help you get a feel for the dynamics of the Versus roll. Every roll in Maelstrom's Edge that has you compare one value to another works this same way, except that the rule that you automatically fail if the opposing number is 3x your own is unique to discipline checks.
2.2.2. Select an Action
The Epirian player rolls a 5 and passes the check. Hooray! That means he now gets to choose freely one of the following actions for the unit to perform:
- Advance and Fire: your basic move and shoot action;
- Dash: allows you to move faster, but shoot with less accuracy;
- Dig-In: allows the unit to protect itself, whilst either staying put and firing normally, or moving but firing inaccurately;
- Hold and Fire: the unit must stay in place, but shoots more effectively;
- Charge: allows the unit to engage an enemy at close quarters.
2.2.3. The Advance and Fire Action
We select the Advance and Fire action. In this action, your unit gets to first make a single move and then fire a normal round of shooting. Let's first look at how to perform a single move.
2.2.4. Making a Single Move
Each model has a Movement characteristic (MV). A single move allows you to move up to the number given by the MV characteristic in inches.
When you move a unit you can basically do two things: end your move in cover or end your move in open ground. If you choose cover you'll be more protected, but if you choose open ground you can go faster by using open ground bonus movement. If you consider using this bonus, roll for it before you move: you roll 1D3 (that's a normal D6 with the result halved), the result is the extra distance you can move if you decide not to take cover. Once you've seen the extra distance, you can decide to use it or not. You need to tell your opponent if you'll be taking cover or will be using the open ground bonus; in the latter case your models are not allowed to end their move in cover. A model is in cover any time it touches a terrain obstacle or ends its move in area terrain. These are the two basic terrain types you have on the battlefield, as mentioned in the game set-up section. We'll go into cover more when we get to shooting, but basically a unit in cover can ignore a number of hits it sustains when shot at, which can really make a big difference.
 2.2.4A) The Contractors make a single move to seek cover in the crater.
Next, you simply move each model in the unit up to the maximum distance, so up to its MV characteristic with, possibly, the open ground bonus distance you rolled. You measure the actual path a model takes, including vertically if the model moves vertically more than two inches (if not, the vertical distance is ignored). You're not allowed to go where the model can't physically fit, except that you can move freely through any friendly models. All models in a unit are required to stay within 3" of their squad leader.
That's basically all there is to making a single move: move up to your MV value and decide to be protected in cover or faster over open ground. It's usually smart to move from cover to cover, whilst also trying to get into the rear arc of enemy units or grab any objectives the mission provides. A unit's rear arc is indicated by the notches on the base of each model. If you attack a unit from the rear, it's going to be in more trouble than if you attack from the front, so manoeuvring properly is really important.
Now, to our tutorial: let's go and find some cover with our unit. The Epirian player moves his models up to their full distance (7") towards the area terrain so that 2 of the 3 models are inside of it. For a unit to count as taking cover, at least half its models must be in cover, hence the effort to get at least 2 out of 3 in this case.
 2.2.4B) At least half the models need to be in cover for the unit to count as taking cover
2.2.5. Shooting
Having finished its single move, the unit now gets to shoot. There are 7 steps to shooting:
- Nominate a target
- Determine number of shots
- Roll to hit
- Apply cover
- Roll to penetrate armour
- Remove casualties
- Place suppression tokens
Step 1) First, you need to nominate a target. This can be any unit that has at least one model within line of sight (LOS) of your unit. Your unit's line of sight is determined by its squad leader; this is the model that directs the unit's actions. This means that you need to check line of sight from your squad leader's perspective. A couple of other things need to be noted with regards to line of sight:
- For a model to be visible, you need to be able to see any part of its body. Seeing the end of a gun or antenna is not enough;
- You can see out of, into and over area terrain, but not through it. When looking into area terrain, any terrain actually modelled on the base is ignored for line of sight purposes;
- You can see through gaps in obstacles, as long as you or the target is touching the obstacle;
- Other models do not block line of sight.
If the view from your squad leader to at least half the models in the target unit is at least partially obscured, the target is a fleeting target, which means it will be harder to hit. A unit is also automatically a fleeting target if it is in cover.
 2.2.5A) The Contractor leader can see the Karist unit, but as he can only see one of the three models, the unit is a fleeting target.
Let's get to our actual tutorial units. The Contractor unit we've just moved will be shooting at the Karist Trooper unit hiding behind the wall. Our squad leader can see out of the area terrain freely, but he can only see one of the Karists. This means the Contractor unit has line of sight to the complete Karist unit, but the Karists will be a fleeting target because at least half their models are obscured from the sight of our squad leader. The Karists are not in cover, because they are not touching the obstacle (the wall). Conclusion: the Karist unit is a valid, but fleeting target. Let's shoot them.
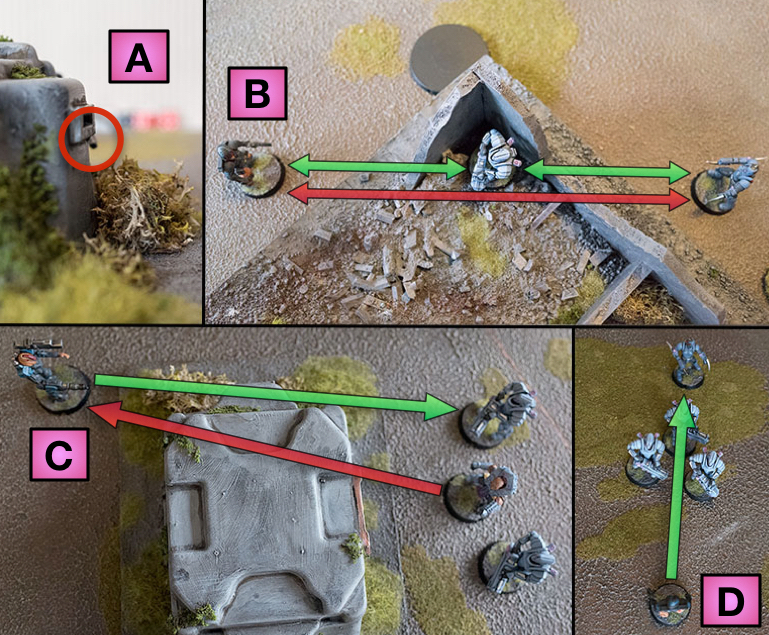 2.2.5B) Additional line of sight examples:
A: The end of a gun is not enough to have LOS to the Bot Handler behind the building.
B: The Bot Handler can see into the area terrain, so has LOS to the Tempest, but not through the area terrain, so he doesn't have LOS to the Shadow Walker. The Tempest can see both other models. The actual walls mounted on the base are ignored because it is area terrain. The Tempest is a fleeting target, because it is in cover in area terrain.
C: One of the Tempests can just see the Scarecrow, but the squad leader, the Kaddar Nova, cannot. Their unit therefore has no LOS to the Scarecrow, whilst the Scarecrow does have LOS to them, though they will be a fleeting target.
D: Models do not block LOS, so the Bot Handler can see the Shadow Walker through the Tempests. When you draw line of sight through a model or a unit, however, the target is also a fleeting target.
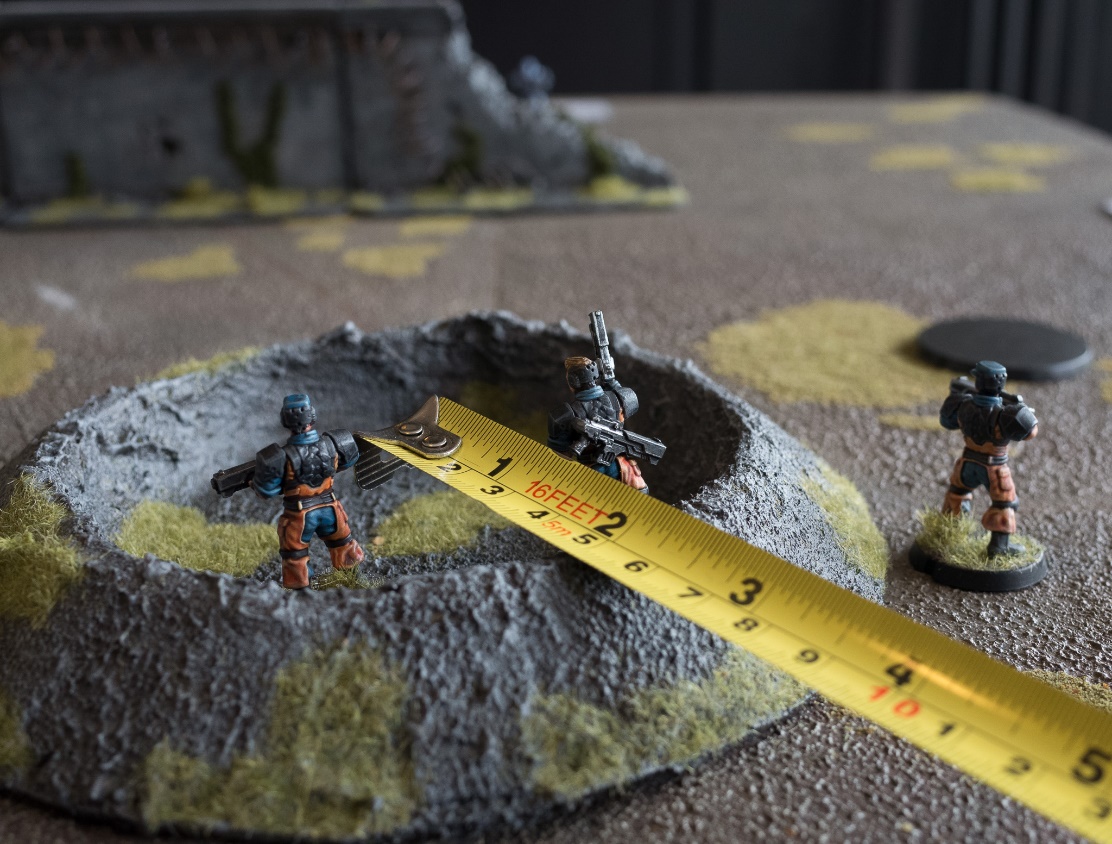
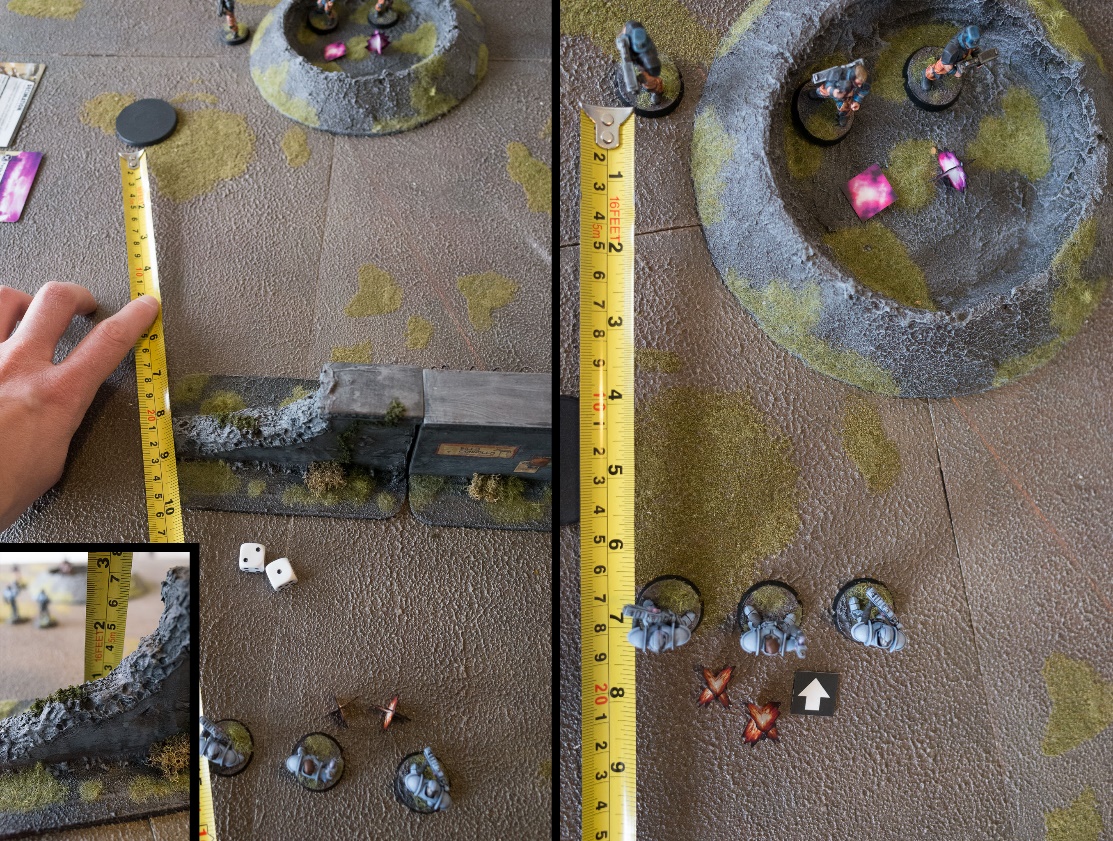
Once you've selected your target and determined whether you'll be firing at a fleeting target, it's time to measure range. Range is measured between the closest models in each unit. This one distance counts for every model firing and every model being shot at. If the distance is shorter than 6", you're shooting at short range. This means the enemy will first be firing defensively at your unit and may also have an effect for weapons that are particularly strong at short range, or, indeed, only useful at short range. We won't go into defensive fire just yet, but it's basically a round of shooting that's fired at you before you do your thing, so it can be quite dangerous to attack the enemy at short range!
Depending on your weapons, the target may also be at long range. This is the case if the target is further away than the listed range for the weapon you're using. We intend to fire the Contractors' Maglock assault rifles. They have a range of 24", whilst the Karist Troopers are 18" away. This means the Contractors won't be shooting at long range. Instead, they are at what we call 'standard' range. If the target were at long range, you could still shoot, but would be firing wild, in which case you're hitting only on sixes.
 2.2.5C) The Karists are within standard range of the Contractors' rifles (24"). You can also see clearly that the Karists are not in cover: they are not touching the wall.
Step 2) Now that we've selected our target and determined it's at standard range and a fleeting target, it's time to determine the number of shots fired.
Each model in the unit can fire one weapon (unless it's a large model). Pick the weapons each model will be using and add up the number of shots the weapons fire as indicated by their shots characteristic (SHO). This is the number of dice to grab.
Our 3 Contractors will fire 3 Maglock assault rifles that each have 2 shots, so let's grab 6 dice. if they were using a mixture of different weapons, you'd need a dice colour for each weapon type.
Step 3) Next, you roll to hit. Compare the Skill characteristic (SKL) of the firing models against the Evasion characteristic (EVS) of the target unit. Now, because our target is a fleeting target, we have to double the target unit's EVS value. The Contractors have SKL 3, vs. EVS 6 (3 doubled) for the Troopers. The roll works the same as for the activation check:
- You need to roll 2+ if your value is at least double that of the target;
- You need to roll 3+ if your value is higher, but not double;
- You need to roll 4+ if your value is equal to or lower than the target's;
- You need to roll 5+ if your value is only half that of the target, or worse.
There is no auto-fail in a round of shooting as rolling to hit is not a discipline check, but if you were firing wild you'd be only hitting on sixes.
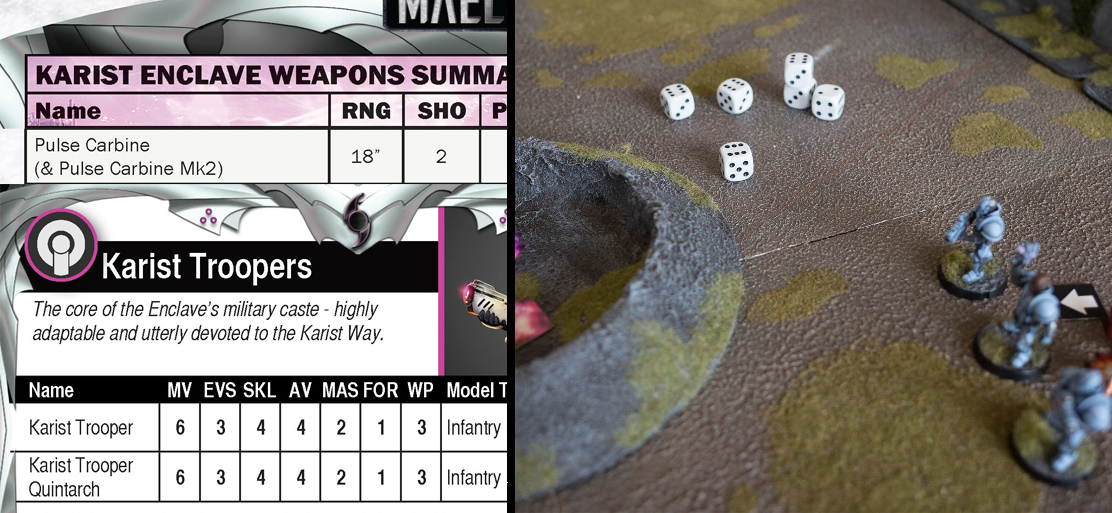
At SKL3 vs. EVS6 we're at half the target's value, so we're hitting on 5+. The Epirian player rolls the 6 dice he grabbed and gets 2 hits.
 2.2.5D) The profile for the Contractors' rifles lists 2 shots a piece. The Epirian players rolls 6 dice, needing 5+ to hit: The Contractors have SKL3, and the Troopers get EVS6 because their EVS is doubled due to being a fleeting target. A 5 and a 6 net the Contractors 2 hits.
Step 4) The next step is to apply cover, but our target isn't currently in cover so we can skip this step.
Step 5) With the hits that remain after applying cover, still 2 in our case, we roll for armour penetration. For this roll, compare the weapons' Penetration characteristic (PEN) against the target unit's Armour Value characteristic (AV). Use the same versus table again to see what you need to roll to penetrate. As the Maglock rifle has PEN 3 vs. AV 4 on the Troopers, you'll need to roll 4+.
 2.2.5E) After rolling to hit and scoring two hits, the Epirian players rolls to see if those two hits will penetrate the Karists' armour. Comparing their weapons' PEN3 vs. AV4 on the Karists shows he needs to roll 4+; he gets one penetrating hit.
Our Epirian player rolls the 2 dice and gets 1 successful penetration, or penetrating hit.
Step 6) Now we come to the results. The target unit's owning player, the Karist player, must assign all penetrating hits to models in the target unit. He may apply any hit to any model, but there are a few rules:
- Penetrations are applied according to their damage characteristic (DAM). The most damaging penetrations must be applied first, and the rest follows in order. You can find the DAM value on the profile of the weapon responsible for the penetrating hit.
- You must continue applying penetrations to a single model until it is removed as a casualty, then you can pick the next model.
When a model gets assigned penetrating hits, it can suffer basically three forms of damage:
- The least severe is that it will suffer damage, but not enough to actually injure it. In this case, the unit will become suppressed, but no models will be lost or injured.
- When the damage a model suffers equals its Mass characteristic (MAS), it will suffer an injury. When the damage a model suffers is equal to 2x its MAS, it suffers two injuries, when the DAM is 3x its MAS: three injuries, and so forth. More powerful models will be able to sustain multiple injuries, so they may not be removed as a casualty at this point, but they will be injured and the unit will become suppressed.
- For every injury a model sustains, its Fortitude characteristic (FOR) is lowered by 1. When it reaches 0, the model is removed as a casualty. Most common troops have FOR1 and thus will be removed as a casualty after only one injury. Again, a unit that loses models will also become suppressed.
The owning player must keep assigning penetrating hits to a model and add up all their damage until that model has suffered so many injuries that it is removed as a casualty. When that happens, any leftover penetrating hits must be assigned to the next model in the unit, and so forth.
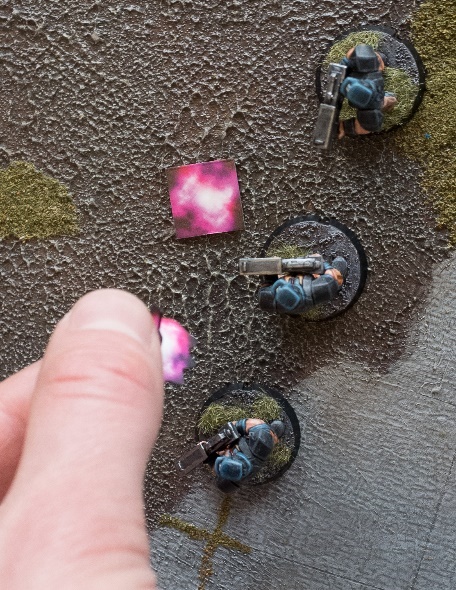
In our battle, the Contractors only scored 1 penetrating hit, which the Karist player must now assign to one of the models in the target unit. This can be any model, even those that were out of sight of the attacker's squad leader. He chooses the model shown in image 2.2.5F. What happens: the profile for the Maglock assault rifle dictates that its hits do 1 DAM. The profile of the Trooper that now got hit shows its MAS to be 2. We can conclude that he will suffer no injuries, because the total damage, 1, does not equal his MAS of 2. No injuries means no models will be removed. In fact: nothing happens, except for the unit getting suppressed, which can have serious effects by itself. Had two hits penetrated, the Trooper would have suffered an injury and thereby become a casualty.
 2.2.5F)
The one penetrating hit is allocated to one of the troopers. The hit being DAM1 and the trooper MAS2 means he suffers damage, but not enough to injure him.
2.2.5F)
The one penetrating hit is allocated to one of the troopers. The hit being DAM1 and the trooper MAS2 means he suffers damage, but not enough to injure him.
Step 7) To finish the round of shooting, we place suppression tokens (STs). The number of tokens to place beside the target unit is counted as follows:
- 1 for being targeted (so shooting a unit always nets you this);
- 1 for every hit ignored through cover (these are so-called 'psych' STs, about which we won't go into further detail in this tutorial);
- Plus a number equal to half the amount of damage actually suffered by the target (2 tokens for 4 damage, 3 for 5, etc.).
With this, the round of shooting is complete! There are 7 steps, which may seem complicated at first, but with familiarity comes speed.
 2.2.5G) The damage done by the Contractors' shooting causes 1 ST to be placed, added to the one always inflicted by targeting a unit with shooting.
2.2.6. Finish the Activation
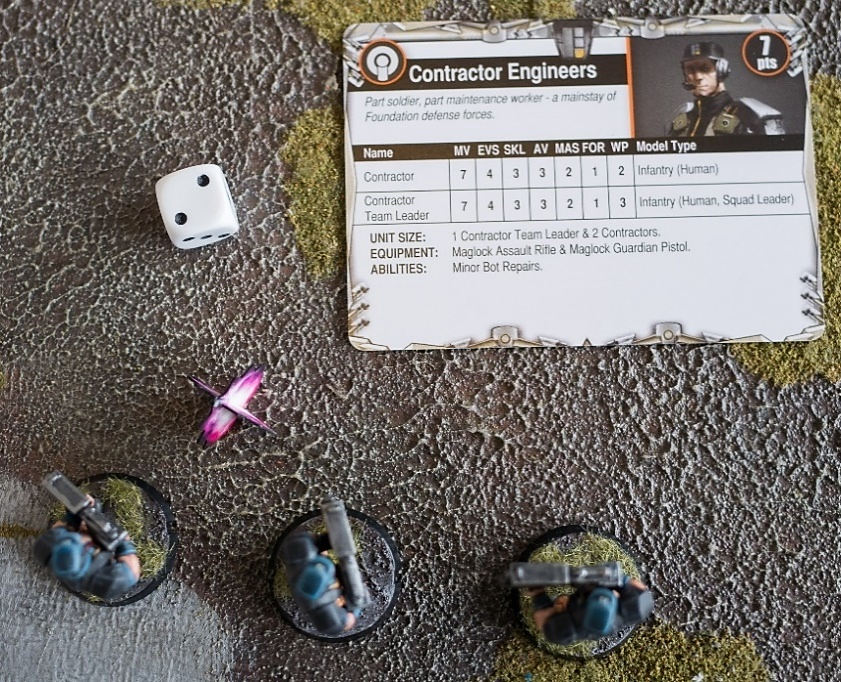
When a unit has performed whatever the chosen action allows them to do, it's time to round up the activation with the last step of any activation: shake-off suppression tokens. What this entails is you roll a D3 and remove that number of suppression tokens from the unit you just activated. Our Contractor unit had 3 tokens. The Epirian player rolls 2 on his D3. We remove those two and leave the unit with 1 token. It may also be advisable in larger battles to now place an 'activated' token next to the unit indicating it's been activated this turn.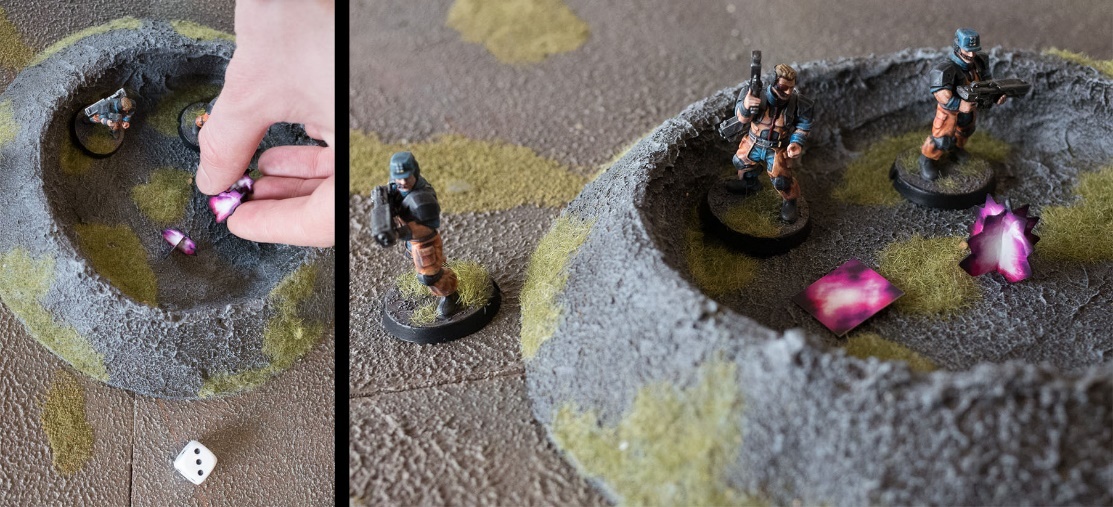 2.2.6A) The Contractors end their activation. With a roll of 3, their D3 score is 2, so the Epirian player removes 2 STs from the unit. He then places an 'activated' token.
 2.2.6B) The field after the first activation.
2.2.7. Activate the Next Unit
After the first activation, the attacker must now let the defender, the Karist player, activate one of his units. He selects the Karist Trooper unit which was just shot. We go through the same steps again:
- Activation discipline check;
- Choose action;
- Perform action;
- Shake-off suppression tokens.
 2.2.7) The Karist player activates his first unit. With WP3 vs. 2 STs he needs a 3+ to pass the discipline check. Success!
There are now two tokens on this Trooper unit, and the WP for their squad leader is 3. This means the Karist player needs to roll a 3+ to pass the activation check. Lucky for him, he succeeds!
2.2.8. The Dash Action
Now he gets to choose an action. Let's select the next action from the list: Dash. Now, like Advance and Fire, Dash also lets you move and shoot, only you move faster and shoot less effectively. A Dash lets you make a double move rather than a single move, and fire a round of wild shooting rather than normal shooting.
2.2.9. Making a Double Move (+ 'On the Move')
Where a single move allows you to move up to the number given by the MV characteristic in inches, a double move allows you to move double that distance. When making a double move, you also get to roll 2 D3s for your open ground bonus movement instead of 1. The rules for single and double moves are the same, but when you finish making a double move you get an extra option: if your unit made a double move and did not take cover, you can elect for that unit to be on the move. When a unit is on the move, the following rules apply:
- When it shoots, it fires wildly (so only hits on sixes);
- It is a fleeting target, so doubles its EVS when shot at;
- It has the Dodge ability, which is similar to being in cover, which we'll talk about shortly.
- It cannot fight back when it gets charged (called 'reactive CQ fighting').
If you choose for your unit to be on the move, place the appropriate token by the unit. The next time the unit activates, the token is removed again. Remember you can only choose to be on the move when you make a double move and do not take cover.
The Karist player rolls poorly for his open ground bonus movement: only 2 extra inches, leaving him just short of the objective. He moves his unit as close to the nearest objective as it can get, without getting within 6" of the enemy (as they'd suffer defensive fire if they attacked them) and elects to be on the move. This means the unit's shooting will be wild fire, but in a Dash action, the unit will fire wild anyway, so the disadvantage only plays when the unit is called upon to fire defensively before its next activation (we'll get to that later). Karist Troopers have a MV of 6, so we move them near 14" towards the nearest objective (12+2 bonus), and place an 'on the move' token near the unit.
 2.2.9) The Karists perform a Dash action. They first make a double move, using open ground bonus movement. Unfortunately, they roll poorly and just can't reach the objective. Instead, they move as close as they can without entering into the dangerous 6" short range of the Contractors. Note that units may cross obstacles less than 2" in height without measuring any vertical movement. At the end of their move, the Karists elect to be 'on the move', giving them some added safety against shooting, and place the appropriate token.
Note that a double move is not actually two moves; it's just one move with the above rules. It's also not required to move further than you could when using a single move. In fact, you can just choose to stand still in a double move, or just pivot.
2.2.10. Wild Shooting
The second part of the Dash action is to fire a round of wild shooting. This is exactly the same as normal shooting, but you'll only hit on sixes. Let's shoot at the Contractor unit that just went for cover in the area terrain, so we can see how cover works.
Let's see our 7 steps for shooting again:
- Nominate a target: our target unit is visible to the squad leader, it's a fleeting target because it's in cover, and we're already firing wild so it doesn't matter which arc it's in. The range of the Troopers' weapons, Pulse Carbines, is 18", so they're in standard range;
- Determine number of shots: Each Carbine fires 2 shots, and there are three of them, so we'll have 6 dice;
- Roll to hit: the Karists would pit their SKL4 vs. EVS8 (4 doubled as the Epirians are a fleeting target), so would normally need to roll 5+ (4 is only half of 8). However, because they are firing wild, they need to roll sixes. They get really lucky and roll four sixes!
 2.2.10) For the second part of their Dash action, the Karists fire a round of wild shooting. Pulse Carbines fire 2 shots each, so the Karist player rolls 6 dice. To hit, the Karists have SKL4 vs. EVS8 (4 doubled because the Contractors are a fleeting target), but it doesn't matter in this case because a unit performing a Dash Action can only fire wild and will therefore only hit on sixes. The Karist players gets four sixes!
2.2.11. Applying Cover
We're now at step 4 in the Karist unit's shooting sequence, which is to apply cover. This is really simple: if the target unit is currently taking cover, as the Contractors are because they are in area terrain, the target unit's owning player may discard a number of hits up to the cover value of the terrain the target is taking cover in. The area terrain the Contractors are in was designated to be cover value 2, so the Epirian player may discard two hits. The Karist player scored four hits, so two of those remain. Whenever hits come from various types of weapons, the target unit's owning player decides which hits are discarded, so can choose to discard the most dangerous hits. There's only one weapon type now, so it doesn't matter which hits specifically are discarded.
 2.2.11) The Epirian player discards two of the four hits because his Contractor unit is taking cover in area terrain with cover value 2.
Now, an important piece of information for the future is that it's beneficial to sneak up to a target's rear arc. When the firing unit is in the target's rear arc, the target reduces its cover value by 1, so is less protected.
The 'Explosive' Ability
Shooting with the Karist Troopers also allows us to have a look at a weapon ability. Many weapons in Maelstrom's Edge have special abilities, listed on their profile. For the Pulse Carbines the Troopers carry this is the 'Explosive (6+)' ability. This has an effect when rolling for penetration, which happens to be the step we've now arrived at.
After applying cover, the Karist player has two hits remaining. He must now roll to penetrate the Contractors' armour (step 5). The 'Explosive (6+)' ability on his carbines means that any sixes he rolls now result in the hits not counting as DAM1 as they normally are, but as DAM2. He'll have to penetrate first though. The Carbines have PEN4 vs. AV3 on the Contractors, which means 3+ to penetrate. Both hits manage to penetrate, and one of the rolls was a 6! That means we have one penetrating hit at DAM1 and another one at DAM2 due to the 'Explosive' ability.
 2.2.12A) For the two remaining hits, the Karist player needs to roll to penetrate the Contractors' armour. With PEN4 vs. AV3, a 3+ is required. Both hits manage to penetrate, with a bonus: Because the Pulse Carbines have the 'Explosive' ability, any 6 to penetrate is resolved not as a DAM1 hit as normal, but as DAM2.
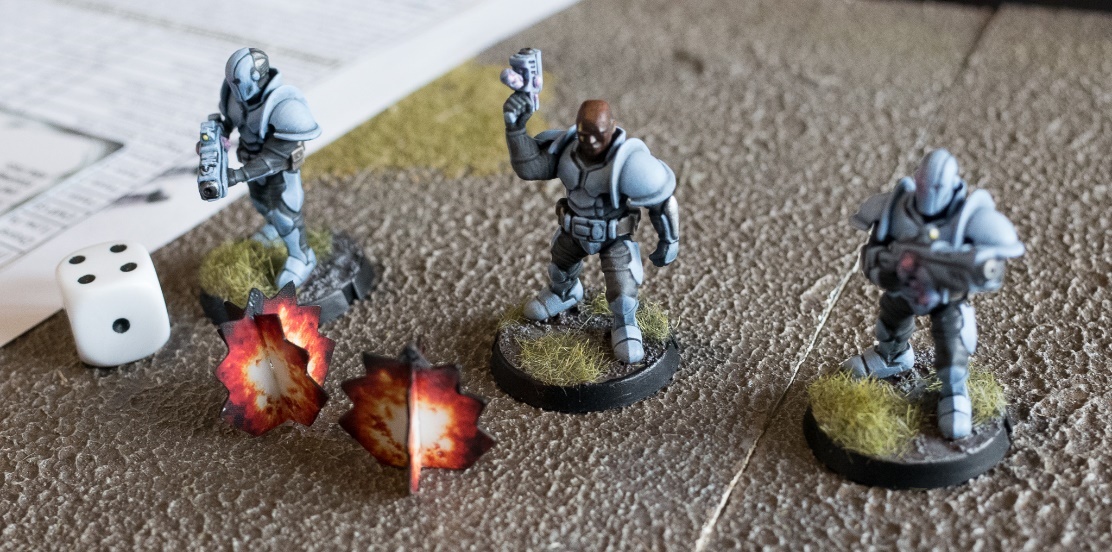
 2.2.12B) The Epirian player must allocate the two penetrating hits to his models, highest DAM first. He picks the one outside the crater to suffer the DAM2 hit. The damage from this hit equals his MAS of 2, which means he takes an injury. His FOR thereby drops from 1 to 0, which means he is removed as a casualty. The second penetration goes on a second model, but as this hit is only DAM1, it will not cause an injury.
At step 6, remove casualties, this works out to the following. The Epirian player must allocate first the DAM2 hit to one of his models. He picks the model outside the crater. A Contractor's MAS is 2, which is equalled by the DAM2 penetration. This means the Contractor suffers one injury. This deducts 1 from its FOR value, which thereby drops to 0, meaning the Contractor is removed as a casualty! The second penetrating hit must then be allocated to another model in the unit. Let's pick the model that's not the squad leader. He suffers a DAM1 hit, which is not enough to injure him, but will count for STs.
To finish the round of shooting, we come to placing STs. The Contractors were targeted (1), ignored 2 hits through cover (+2), and suffered 3 damage in total (halved, makes +2). In sum, this means 5 STs on the Contractor unit. Not bad for wild fire! The unit already had 1 token, so now has to deal with 6.
 2.2.12C) The DAM1 hit does count for placing STs: the unit suffered a total of 3 damage, half of which rounded up is 2 STs. Add another 1 for being a target and another 2 for ignoring 2 hits by cover, and the unit gets 5 STs from this round of shooting. Combined with the 1 it already had, the unit now has 6 STs.
With this, the Dash Action is almost completed. All that remains is for the Karist player to remove D3 STs from the activated unit and to place an 'activated' token nearby. The Karist player rolls the D3 and gets to remove 1 token, leaving the unit with 1.
 2.2.12D) Left: To end the activation, the Karist player rolls a D3 for shaking-off STs, resulting in him removing 1 ST from the unit. Right: the board after the first Karist activation.
2.2.13. Two Activations in a Row
Now, the Karist player has a choice: he may either pass the turn to the Epirian player and let him activate his second unit now, or he can activate his own second unit straight away. The rule is that the priority player always starts the turn by activating only one unit, but after that each player may decide to activate either one or two of their units in a row, before letting the other player activate again. The (Epirian) attacker was the priority player in this first turn, so could only activate the one Contractor unit. The defender, however, may now activate both his units consecutively. This option allows you to immediately exploit with a second unit an advantageous situation created with the first unit.
The Karist player chooses to activate two units in a row, that means he'll now activate his second unit of Troopers. He opts to perform another possible action: Dig-In.
2.2.14. Dig-In (+ Being Pinned)
The Dig-In action gives you two options:
- You stay where you are, become pinned and then fire a normal round of shooting, or
- You make a single move, become pinned and then fire a round of wild shooting.
Note that when you remain stationary, you're not even allowed to pivot! We've seen how a single move and both normal and wild shooting work. Let's look at being pinned. Like being on the move, being pinned requires that you place a token by the unit indicating it is pinned. This has the following (slightly simplified) effects.
A pinned unit:
- adds 1 to its cover value. If pinned while not actually in cover, the unit instead counts as having cover value 1;
- gets to shake-off an extra D3 STs upon completing its main action;
- may only select the closest enemy unit to shoot at;
- suffers a penalty on defensive fire discipline checks, meaning it has to roll one higher than normal to pass.
The unit chooses option b (make a single move and fire a round of wild shooting) and moves towards the nearest objective marker. Once it's moved, the unit becomes pinned, so we place the appropriate token. The unit can then still fire a round of wild shooting, but must do so at the nearest enemy because it's pinned, which is the Contractor unit that remained untouched so far. Again we roll 6 dice. These Contractors are not a fleeting target, but because we're firing wild it's sixes to hit anyway. We get one hit. It's PEN4 vs. AV3, so 3+ to penetrate, but alas! It's a 1. Even though we didn't even get a penetrating hit and thus no damage, there is still 1 ST to be placed because the Contractor unit was targeted.
After placing STs, the Dig-In action is almost done. All that remains is to shake-off STs. This unit doesn't actually have any STs to remove, so we can skip this step, but remember that a pinned unit gets to remove an extra D3 worth of STs at the end of its activation. We place an 'activated' token next to the unit to help us remember that the unit has already been activated this turn.
 2.2.14A) For his second activation, the Karist player chooses a Dig-in action with his second unit, which allows him to make a single move. The Karist player rolls poorly for his open ground bonus movement and ends up moving 7" (MV6 plus 1" bonus). Then, the unit becomes pinned, providing it with some defensive benefit. The Karist player places the appropriate token to show the unit is pinned. The unit will then fire a round of wild shooting at the nearest target: the Contractors just within standard range (18" for Pulse Carbines).
 2.2.14B Six shots are fired, resulting in 1 hit (firing wild, the Karists need 6s), that then fails to penetrate (needing 3+: PEN4 vs AV3). Although the wild shooting did no damage, the Contracters were a target and therefore gain one suppression token.
 2.2.14C) The board after the second Karist activation.
2.2.15. Final Activation
Every unit has now been activated, except for one Contractor unit, which will be the final activation of the first turn. There are no special rules for the final activation, except that the non-priority player always has the option of having the final activation. This can play a part when players have a different number of units, or one player chooses to activate two units in a row all the time, whilst the opponent keeps activating just one unit. In those cases, one player will be done activating before the other. This is fine, the other player then just finishes activating all his remaining units in a row. However, the non-priority player can always choose to keep one unit back and only activate it when the priority player has activated all of his units.
2.2.16. Hold and Fire
The Epirian player wants to choose the Hold and Fire action for his second unit. The activation discipline check isn't hard as the unit only has 1ST. With its discipline of 3, this means 2+ to pass, and they make it. Just like Dig-In, the Hold and Fire action gives you two options, but in both these options you cannot move at all, not even pivot:
- Fire a round of focused fire, or
- Fire a round of suppressive fire.
Both focused fire and suppressive fire are normal rounds of shooting, but when using focused fire, you hit more easily (you need to roll 1 lower than usual), whilst when using suppressive fire, you can cause D3 extra Suppression Tokens to be placed and you may force the target to pivot to face you, which could open them up to a rear attack by another of your units.
Say the Epirian player chooses to fire a round of focused fire at the Trooper unit that's Dashing towards the objective marker. The Epirian unit cannot move during Hold and Fire. This is especially important when the unit you want to shoot is in your rear arc: it's a general rule that you can only fire wild if every model in the target unit is in the firing unit's rear arc. Luckily, the Karists haven't yet moved far enough to be in the Contractor's rear arc, so we're not firing wild this time.
So, let's go through the 7 steps for shooting again. Selecting our target, we can see the unit is clearly in sight of our squad leader. One model is partially obscured by the crater, but as this is less than half of the unit, the unit is not a fleeting target for this reason. It's also within normal range. The unit ÃÆÃâÃâÃÂs, however, a fleeting target because it's 'on the move'. We get 6 shots again, as we have 3 assault rifles with SHO2. To hit, we have the Contractor's SKL3 vs. EVS6 for the Troopers (3 doubled because the Karists are a fleeting target). Normally this would mean a 5+ to hit (as 3 is only half of 6), but because this is a round of focused fire, we're allowed to roll one lower, which makes 4+. Three of the shots hit. Now we apply cover, and find the unit is not in cover. However, for being on the move the Karists are granted the Dodge (1) ability. This works exactly the same as cover, meaning the Karist player may discard one of the three hits. (Note that if a unit were to be both in cover and have the Dodge ability, it must choose to use either the cover or the Dodge value.) To penetrate, we have PEN3 vs. AV4, which means we need 4+ for a penetrating hit. Rolling two fives, both hits manage to penetrate! Each hit is DAM1 and the Troopers are MAS2, so it takes both penetrating hits to injure and thereby kill one trooper, selected by the Karist player. Finally, we place 3 STs by the unit: 1 for being a target, another for ignoring 1 hit with the Dodge ability, and 1 more for causing 2 damage. There was 1 ST on the unit already, so this makes 4.
With the round of shooting completed, it's time to end the Contractors' activation. The Epirian players places an 'activated' token. He'd normally also roll to shake-off STs, but as this Contractor unit only has 1 ST, there's no need to roll a D3: no matter the result, this ST will be removed.
 2.2.16A) The last activation of the turn goes to the Epirian player. With 1 ST, he needs a 2+ to pass the activation discipline check. With a 2, he just succeeds. You can see how the previous round of firing by the Karists may not have done any damage, but might have caused the Contractors to fail this check.
2.2.16B) The Contractor unit fires a round of focused fire at the Karists near the crater.
2.2.16A) The last activation of the turn goes to the Epirian player. With 1 ST, he needs a 2+ to pass the activation discipline check. With a 2, he just succeeds. You can see how the previous round of firing by the Karists may not have done any damage, but might have caused the Contractors to fail this check.
2.2.16B) The Contractor unit fires a round of focused fire at the Karists near the crater.
 2.2.16C) The squad leader can see the target unit clearly. The Karists are a fleeting target, not because one of the models is partially obscured (that's not half the unit), but because the Karists are 'on the move'. The Contractors fire six shots, normally needing to hit on 5+. They will now hit on 4+ because it's focused fire: three shots hit.
 2.2.16D) The Karist player gets to discard one of the three hits, because being on the move grants the unit the Dodge (1) ability, which works like being in cover. The Epirian player then rolls to see if the remaining two hits will penetrate the Karists' armour. PEN3 vs. AV4 means 4+ to hit. With two fives, both hits manage to penetrate and must now be allocated by the Karist player.
 2.2.16E) The two DAM1 hits added up match the Trooper's MAS2, so manage to cause an injury. The Trooper's FOR therefore drops from 1 to 0, making it a casualty. In sum, the focused fire causes 3 STs to be added on the Karist unit: 1 for being a target, 1 for ignoring a hit through the Dodge ability, and 1 for half the damage caused.
 2.2.16F) The Epirian players ends the Contractors' activation by removing their ST and placing an 'activcated' token.
Continue to Part 2 of the Walkthrough
